
Discord Decoded
Discord is an online communication tool similar to programs such as Skype or TeamSpeak, or professional communications platforms like Slack. It supports video calls, voice chat, and text, allowing users to get in touch however they please. In this manual I'll try to cover everything you possibly need in order to use it. If you have any questions after checking out the manual and the FAQ feel free to send me a mail on the address tim.broos@becode.org with the subject "Discord Decoded".
Overview
1. Getting started
2. What's where
3. Settings
4. Friends
5. Servers
6. Communication
- Private communication
- Server communication
- Text channels
- Voice channels
- Mentioning
- Streaming screen / video
- Joining a livestream
- Muting / deafening
- Messaging tricks
7. Notifications
8. Privacy settings
9. Server administration
- Making a server
- General configuration
- Inviting to a server
- Creating channels
- Roles / Permissions
- Audit log
- Custom emojis
- Adding bots
10. FAQ
1. Getting started
Browser or application?
Discord can be run as an application but also in the browser. You don't even need an account if you decide to run it in the browser. If you want to use Discord on a regular basis I do heavily recommend using the application, since you then unlock it's full potential. Some settings are not available on the browser and to optimise your notifications you'll need the application. The app can also login when you start your OS, so that will save you some time.
Installation
You can install Discord on multiple OS's but also on your smartphone or tablet. You can download and install it through this link or one of the links below depending on your OS.
⚠ Download links below ⚠
Linux deb
Linux tar.gz
Windows
Mac
Android
iOS
Logging in
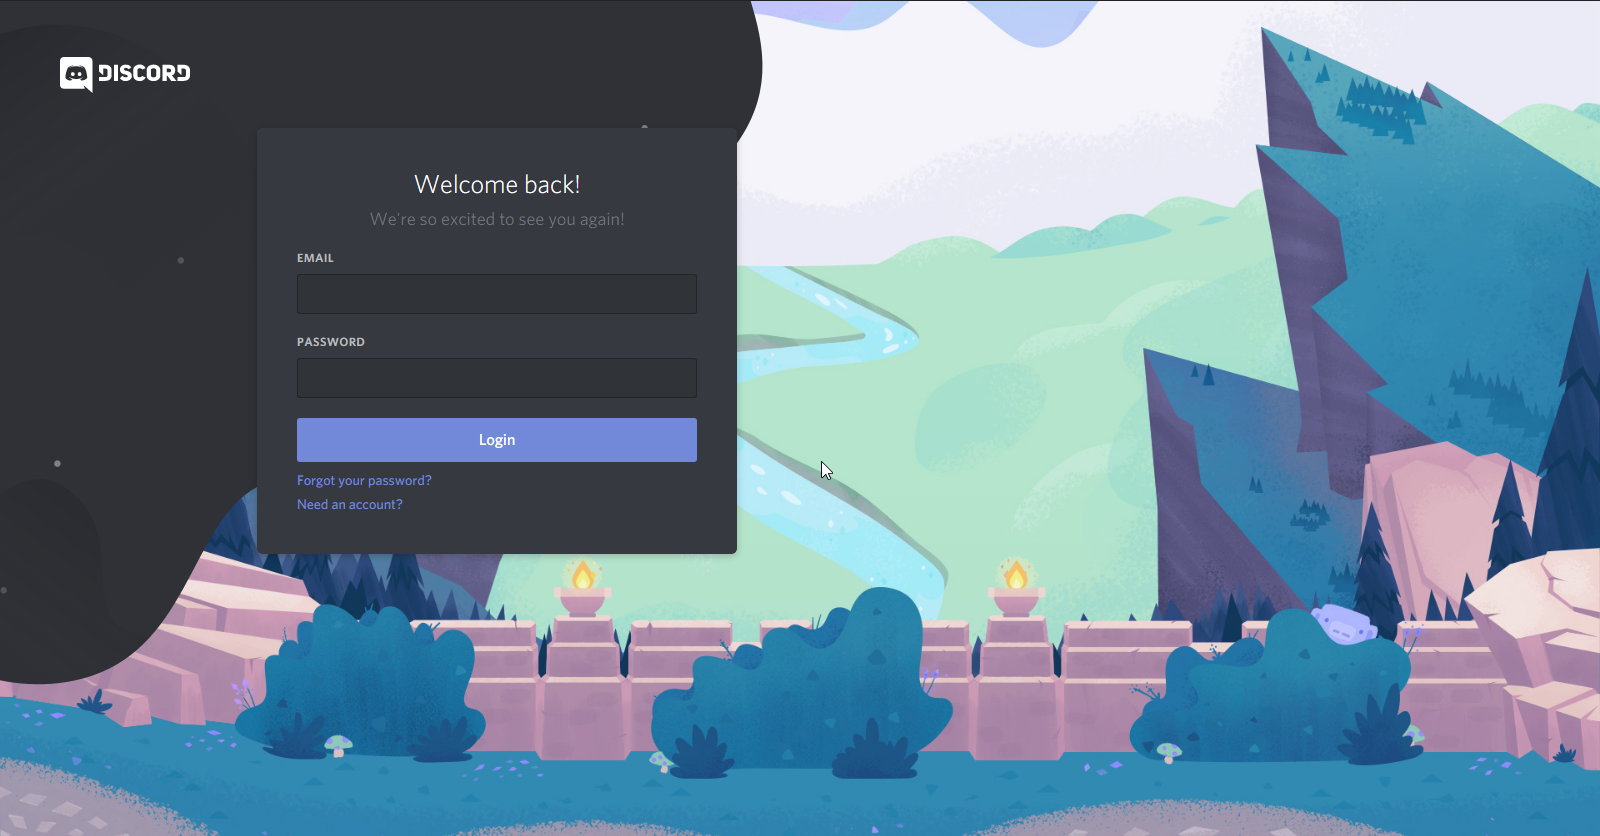
Now that you've installed Discord and you open it, the first thing you'll see is the login screen. It should look something like the image below. If you've already made a Discord account you'll be able to login, if you haven't you can register here. Try logging in!
If you logged in successfully you'll first see the Discord loading animation and afterwards you'll enter the application. Now it looks like this:
Before we can start exploring all the features, you first need to join a server or make a server. After you've done that you'll get a view that looks like the following image, you're now ready to explore Discord.
2. What's where
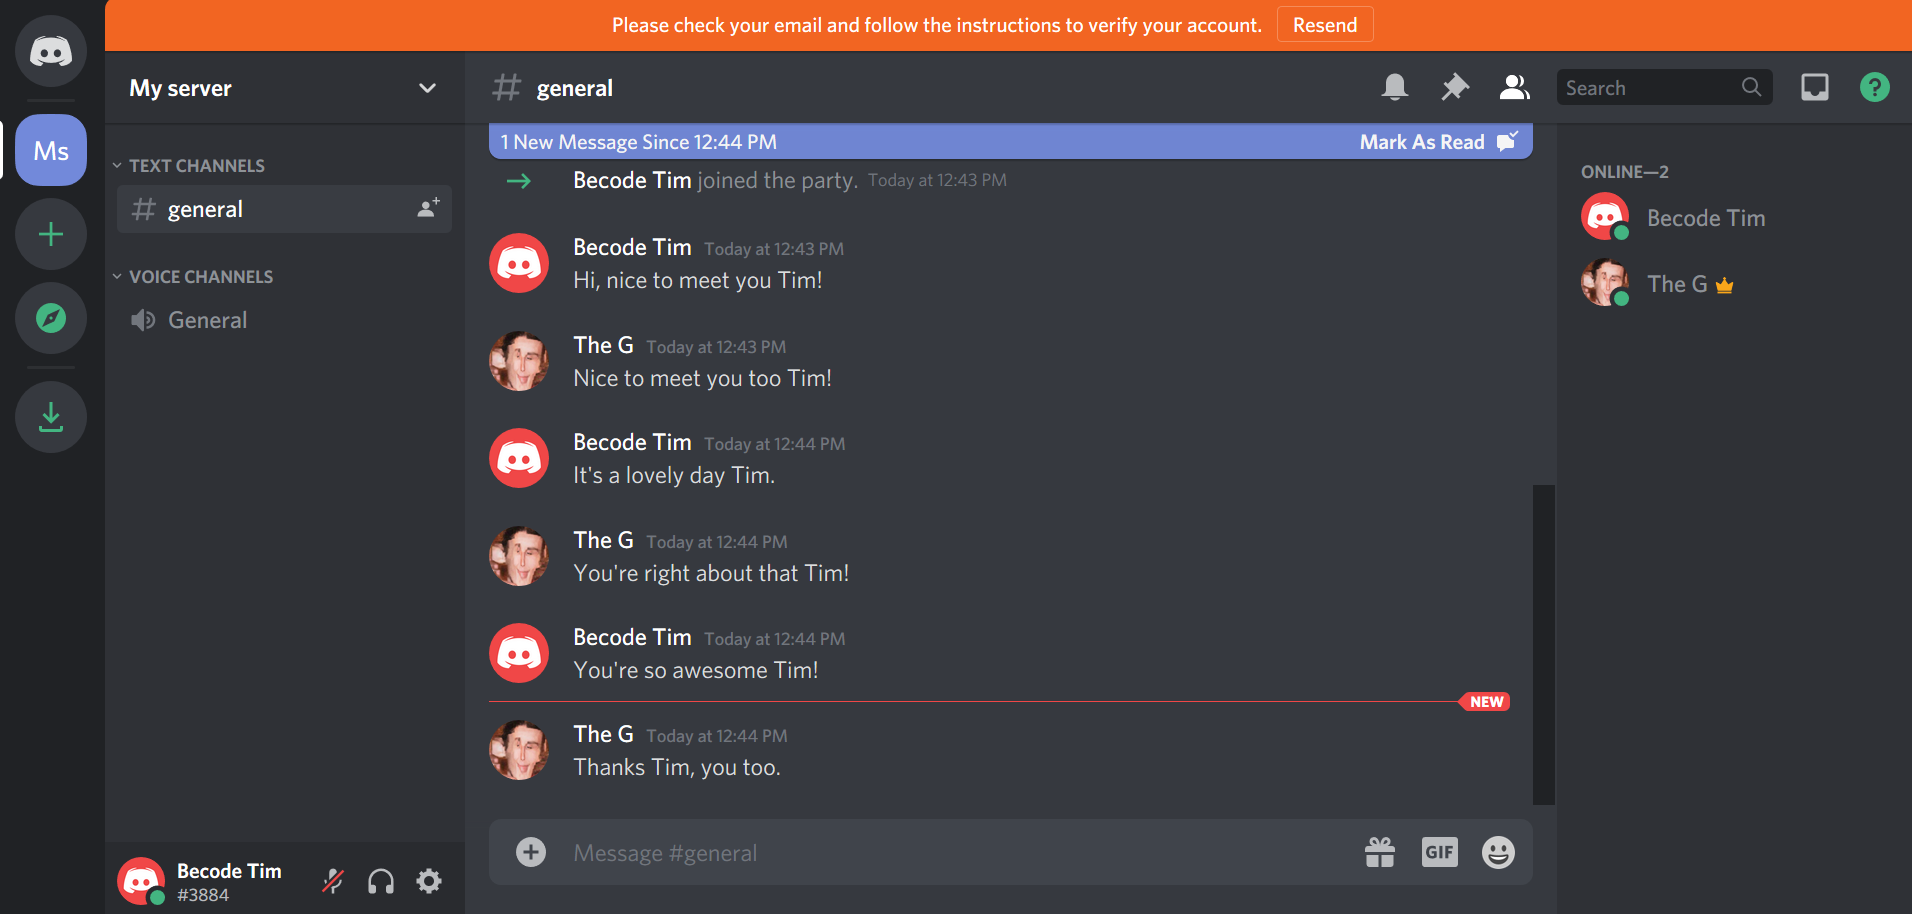
Messages
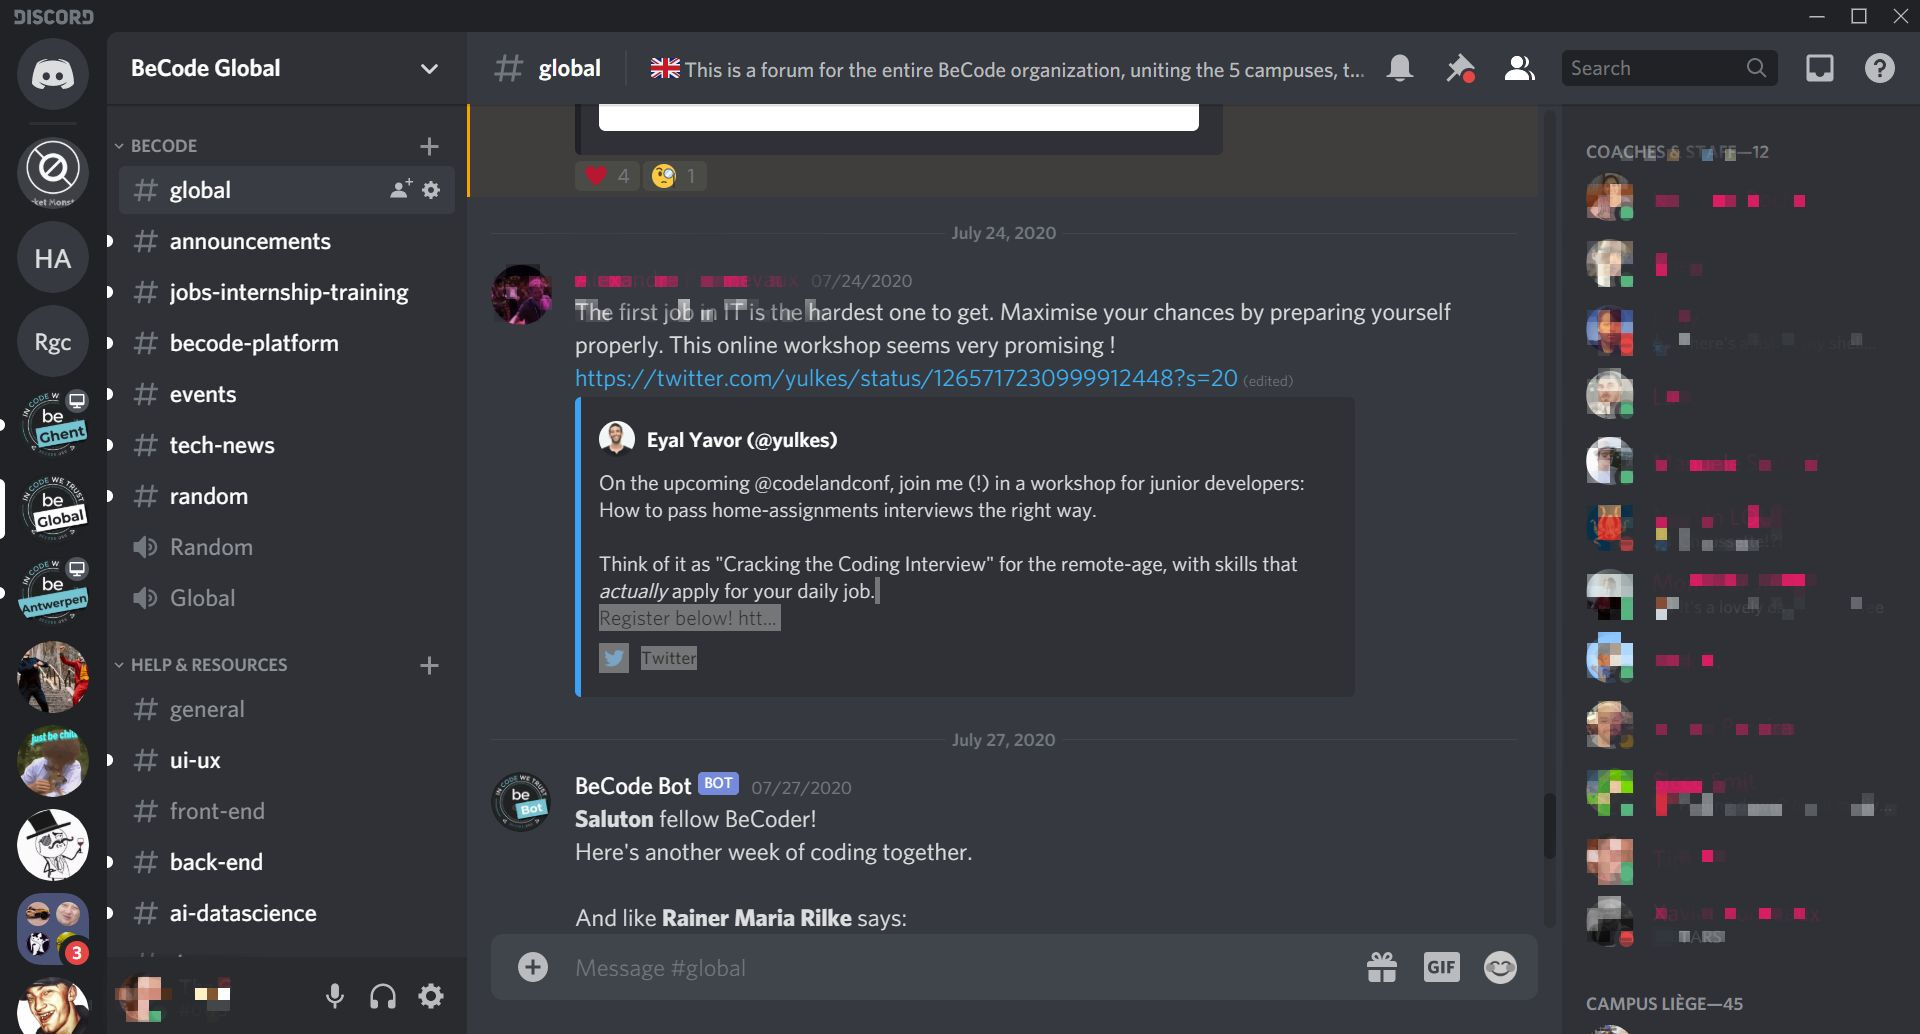
Now that you're inside a server let's start exploring all the fields you'll need. Let's start with the messages. First you need to know that there's 2 ways to send messages, publicly through a server or privately through a direct message.
Since you're now inside of the first server you've joined let's check out the public messages. In the image I've marked the section where you can view messages and send messages.
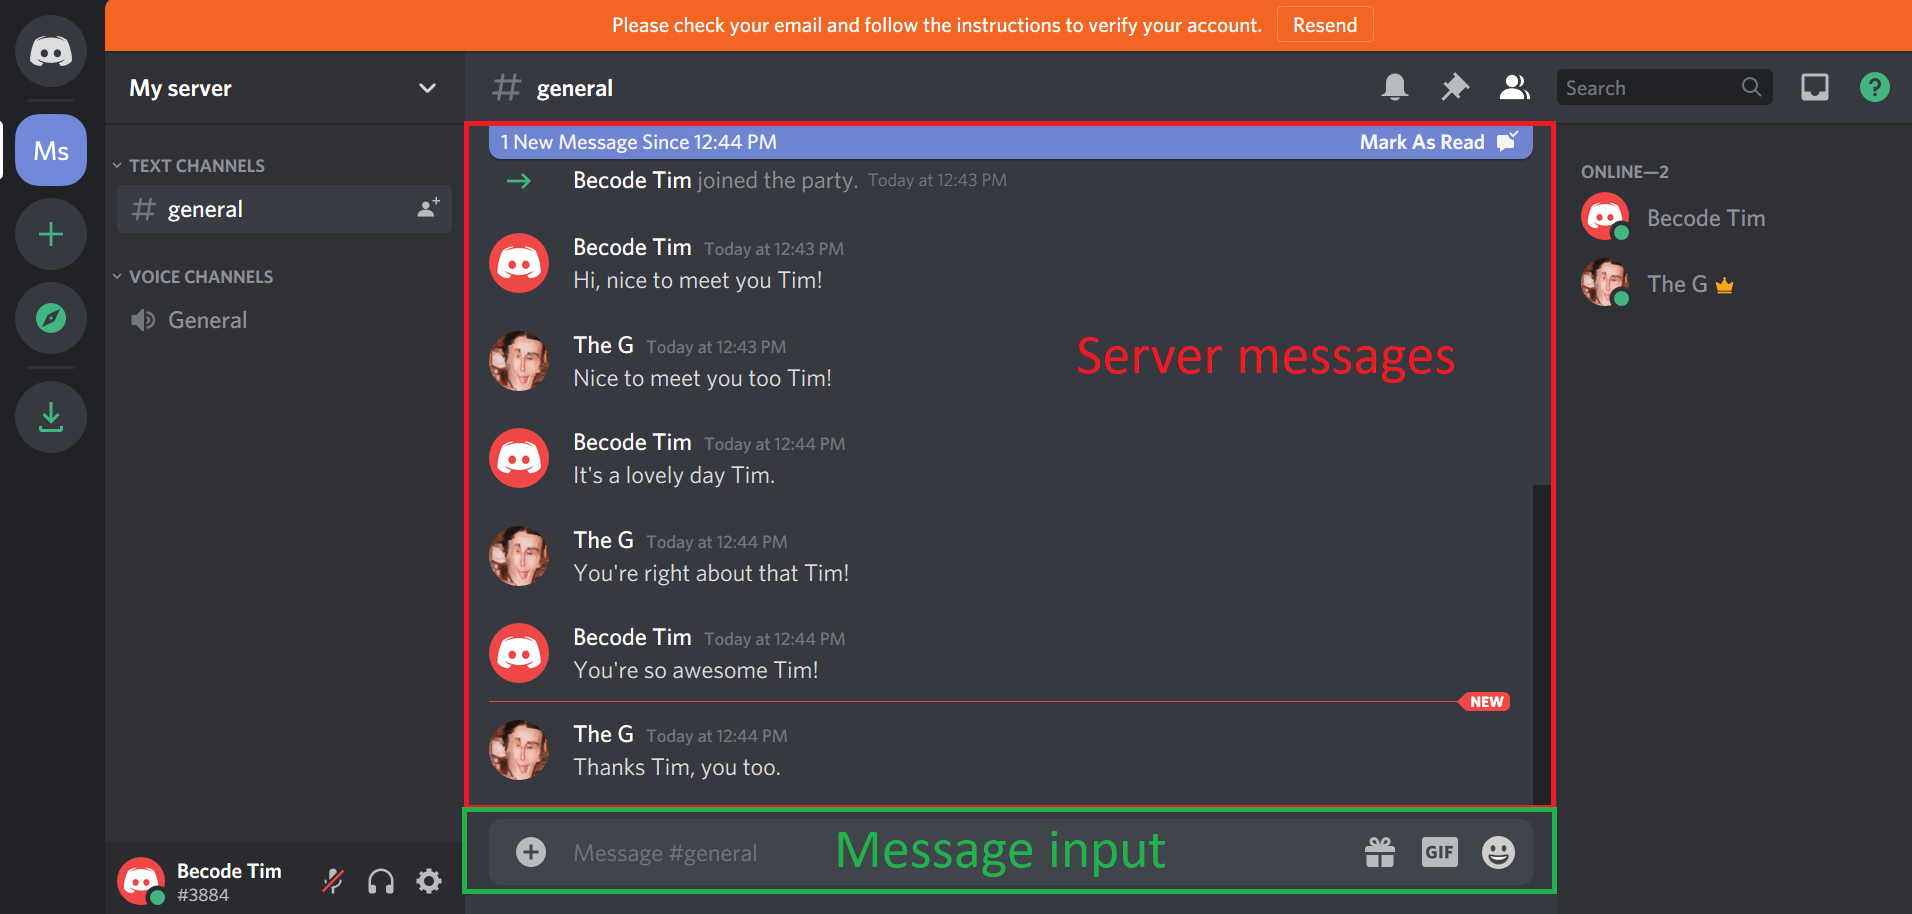
The area marked in red will display messages sent in a server in a specific channel. There might be multiple channels inside a server, for example a channel where announcements are made and a channel where people can chat freely.
The area marked in green is the input field for sending messages. Depending on in which channel you are the message will be delivered to the same one.
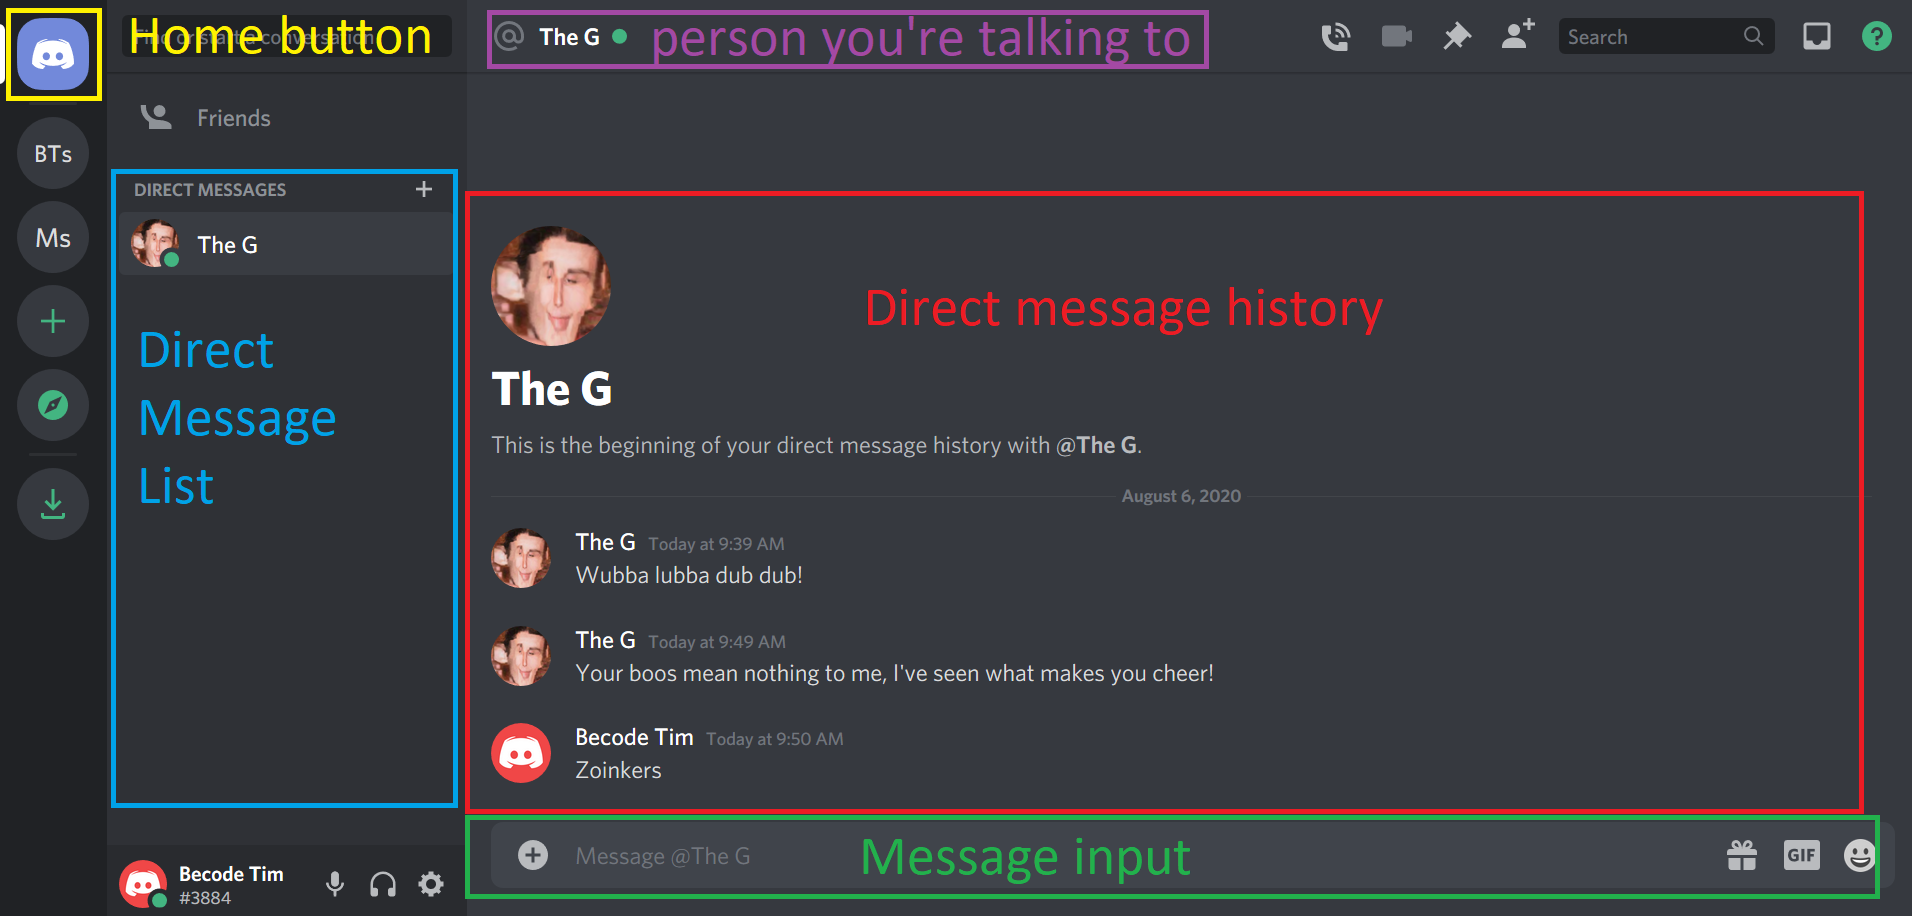
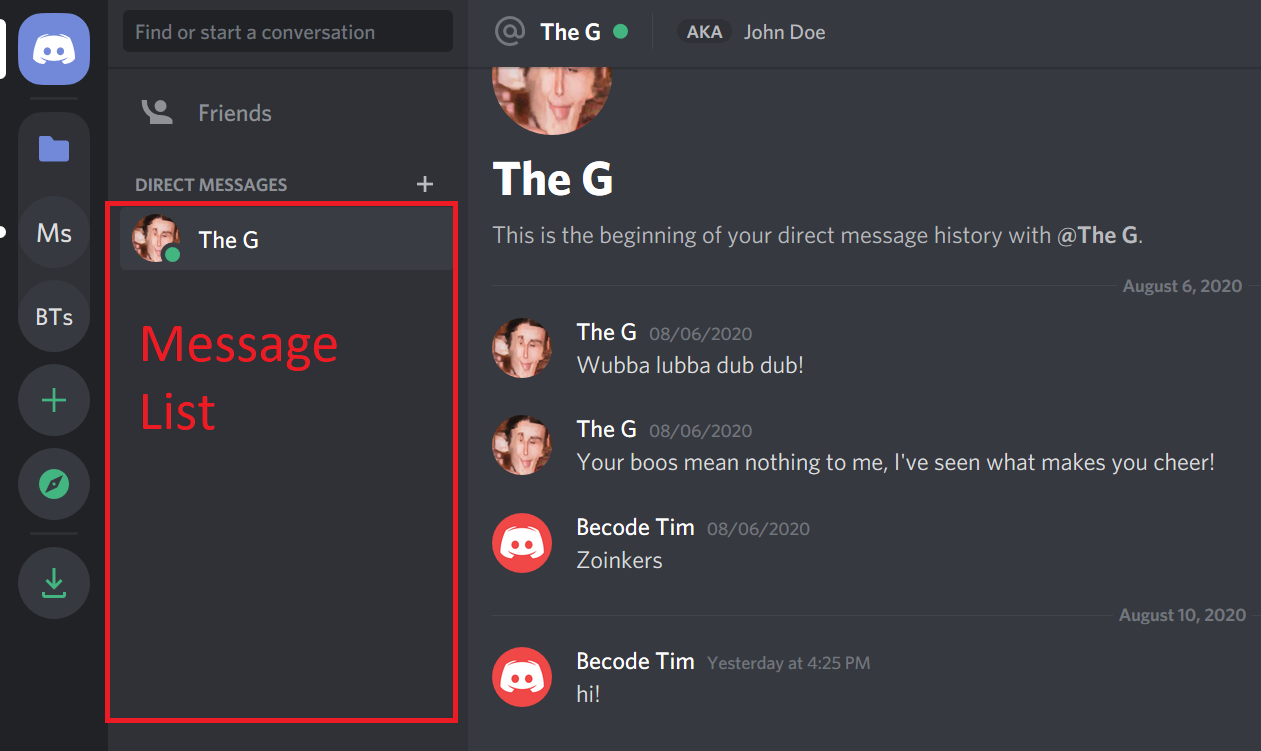
You can also send private messages, click on the home button in the top left to go to your direct message list. It looks like someone sent me a message just now! I got a notification and that person's profile picture has appeared in my direct messages. Click here if you want to learn how to start a direct message with someone privately.
You can reply to this person by clicking their picture, it will open your conversation with that person. It looks fairly similar to the server messages, but nobody except you and the person you're talking to have access to those messages.
Servers
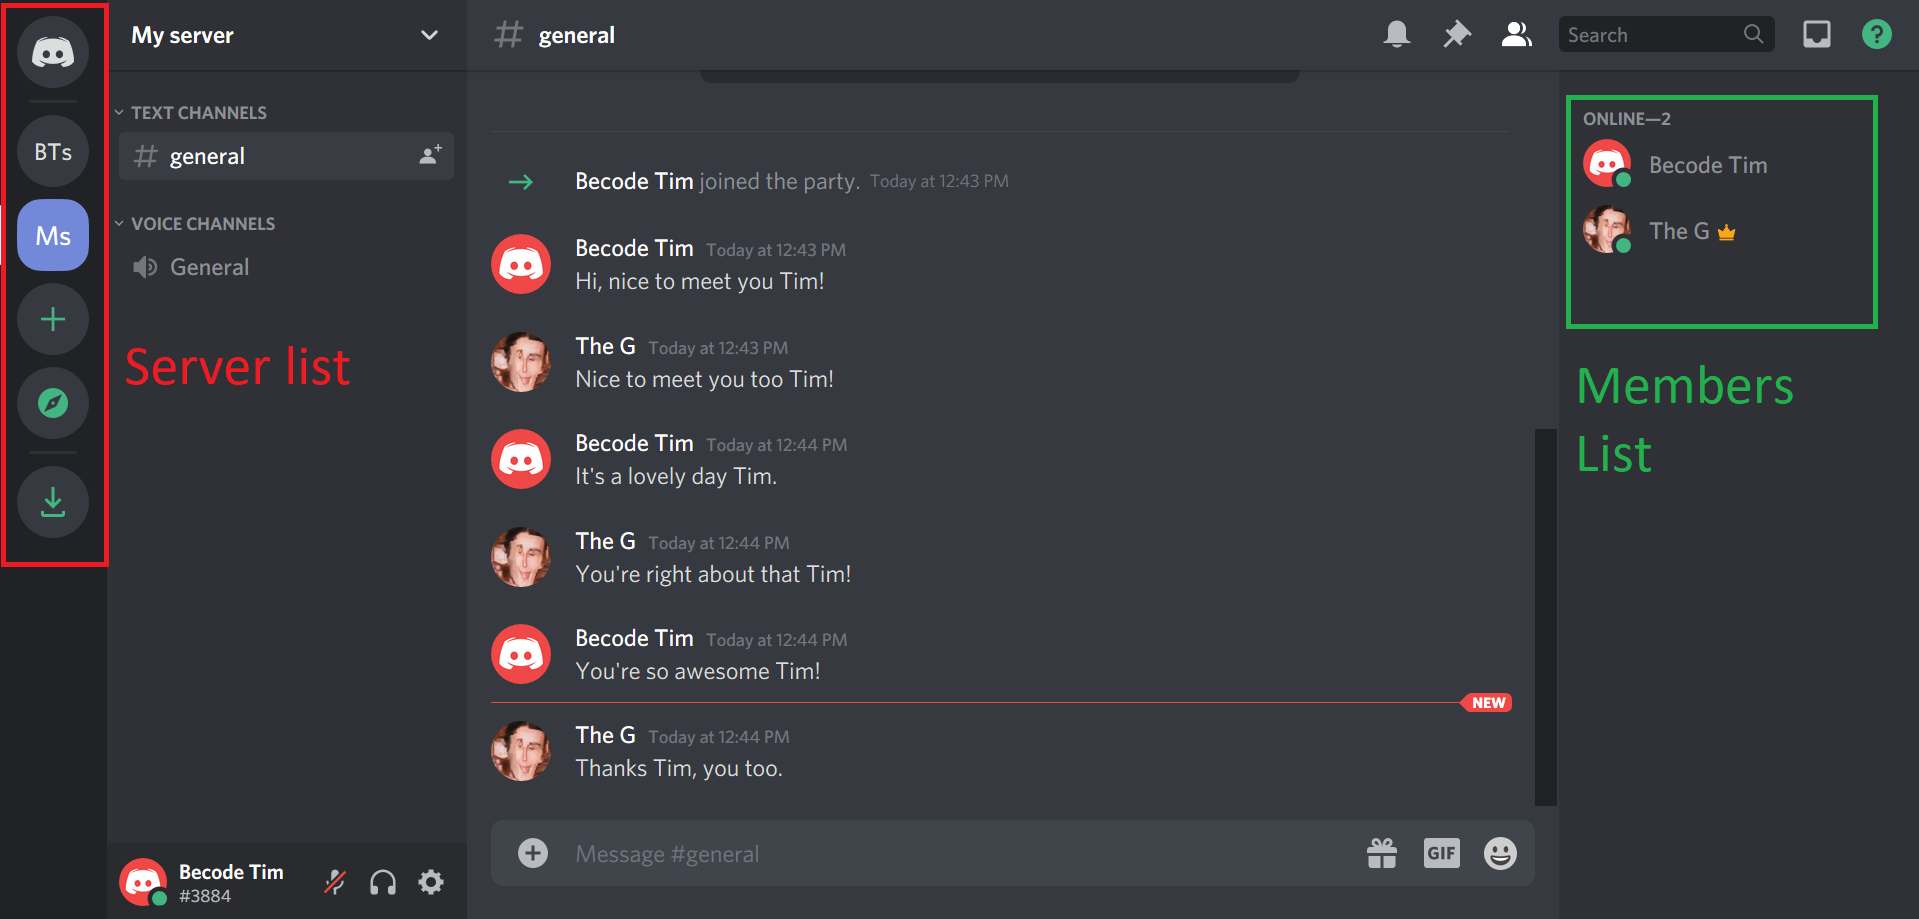
At the moment you only have one Server but soon you might have a couple. In the area marked in red in the image you'll find the server list. You can navigate from server to server by clicking their icons.
In the area marked in green you'll find the members list. This lists everyone that has access to the server.
Channels
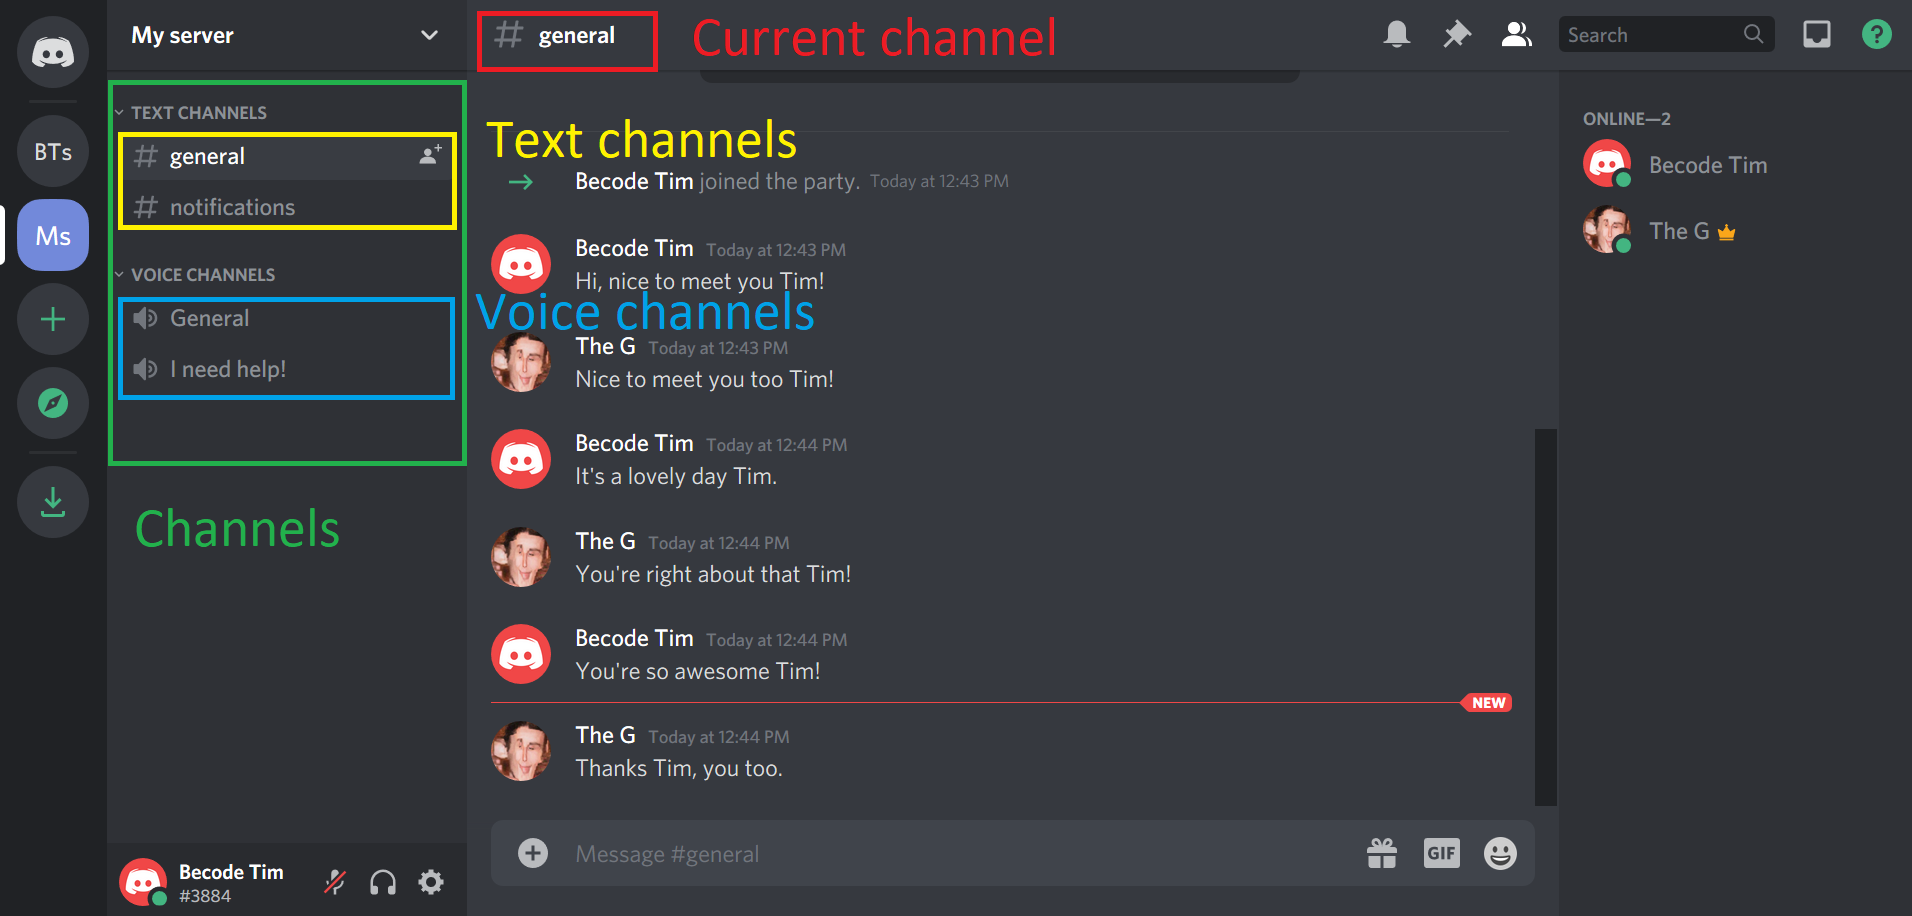
Each server typically has 1 voice channel and 1 text channel at least, but a lot of them have more. Voice channels are meant to communicate through voice activity and text channels through text. If you want to know more about them, check out the channel section. In any case, you can find them in the green area on every server. Voice channels have a leading speaker 🔊 icon and text channels have a leading hashtag #.
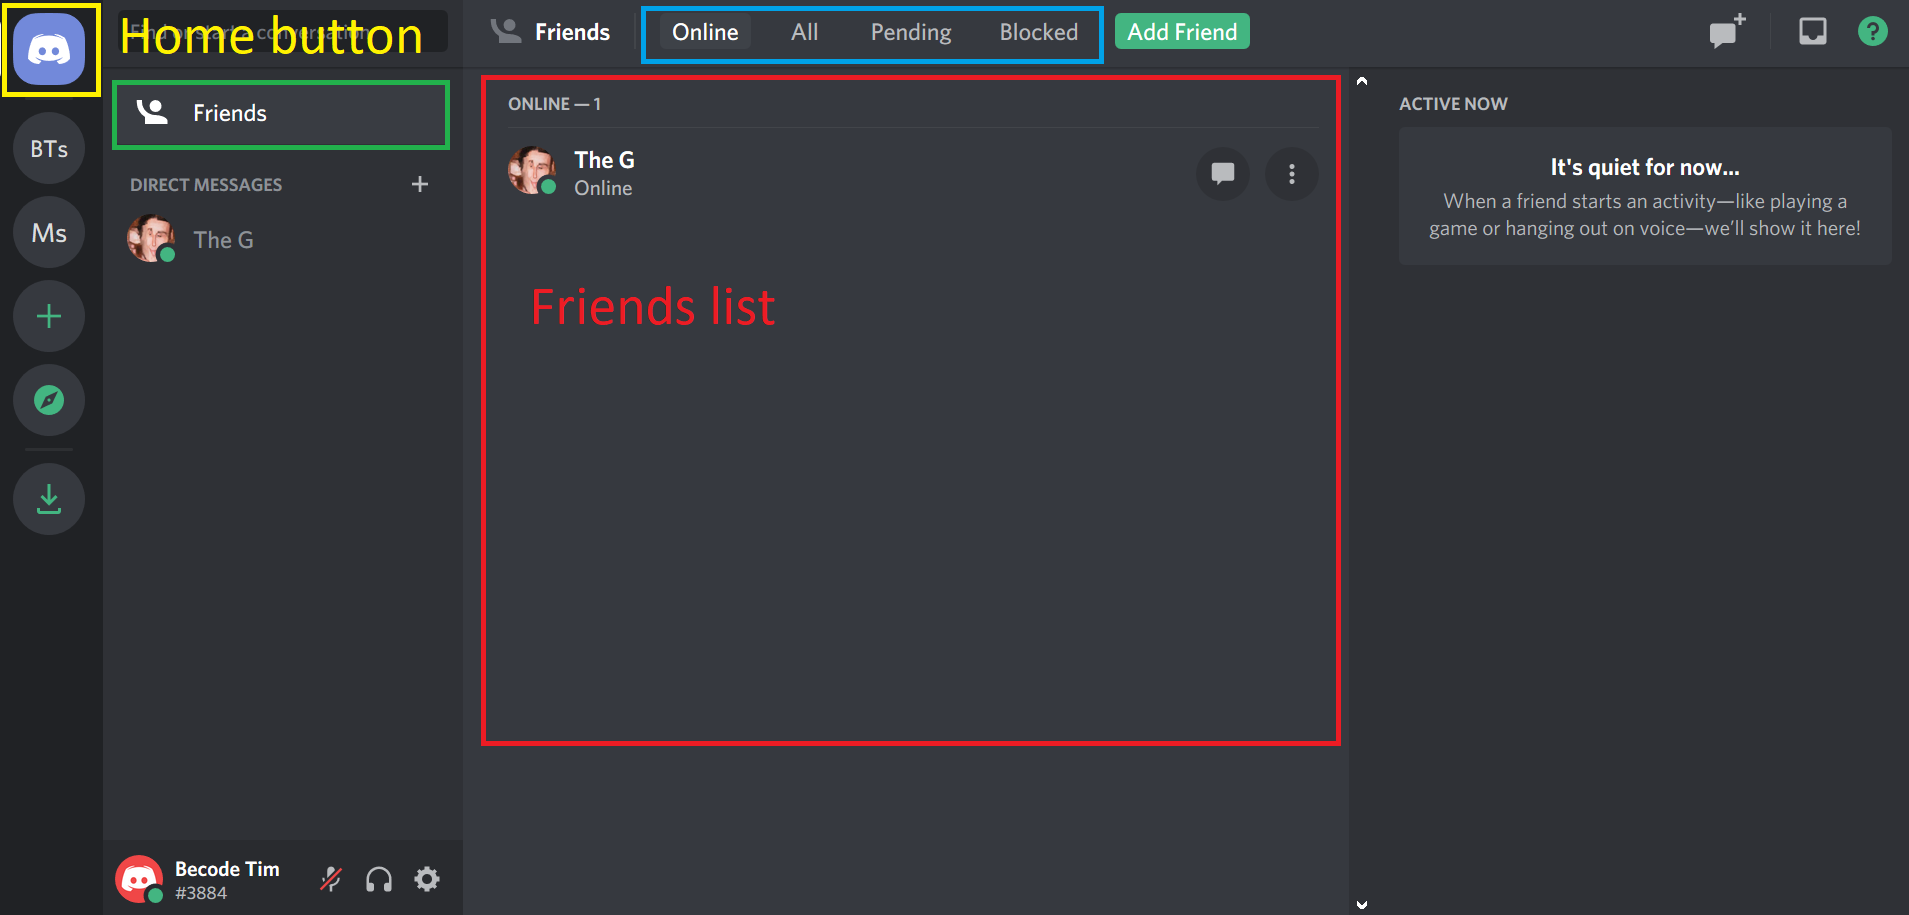
Friends
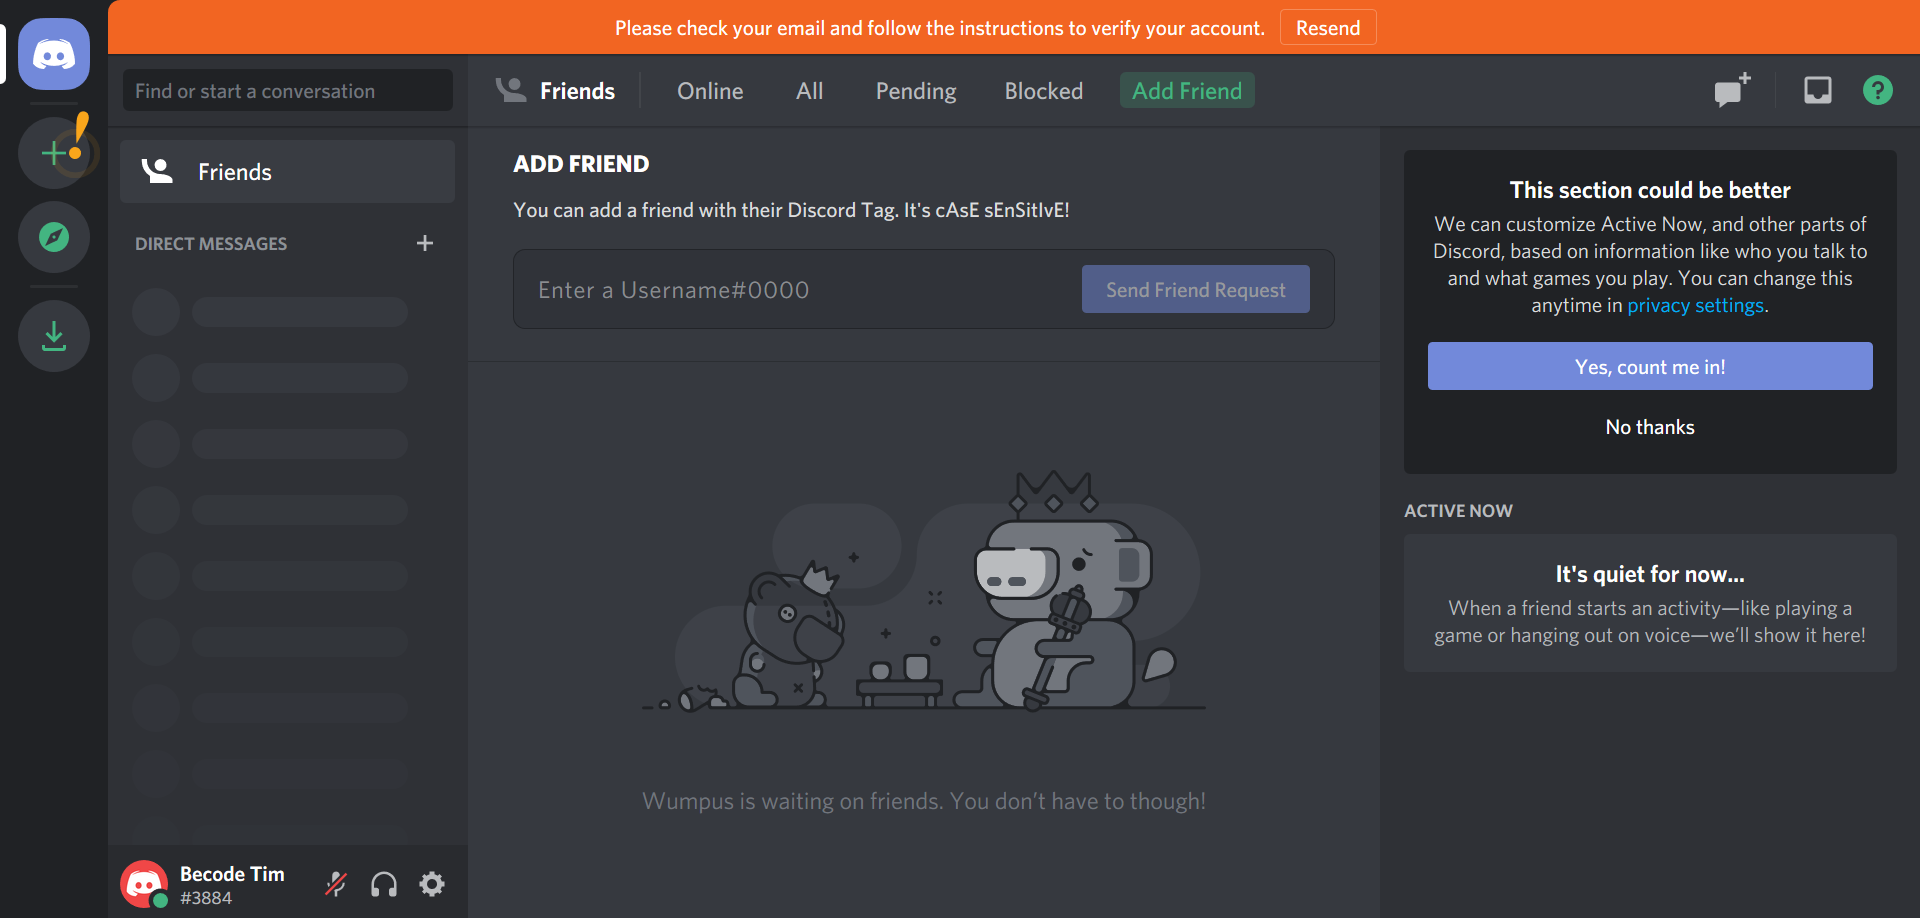
To go to your friends you have to click on the home button and then on the friends button. You'll then see your friends list, if it's empty and you want to add some friends, click here to find out how to do that. In the blue section you can toggle between your online / pending / blocked and all friends. If you want to find out more about friends click here.
Profile and Settings
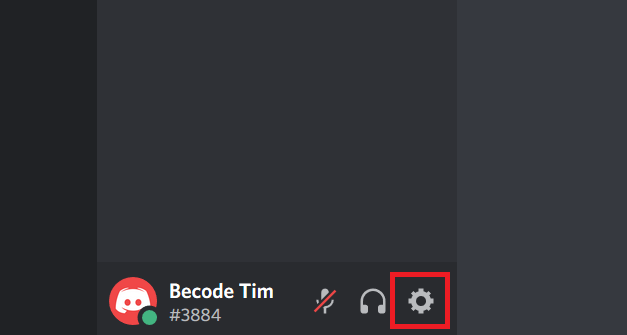
To go to your profile, and all other settings for that matter, click the small gear ⚙ icon next to your profile picture in the bottom left.
From there you can change a lot of your profile settings and other settings. If you want to know more about changing your settings click here.
3. Settings
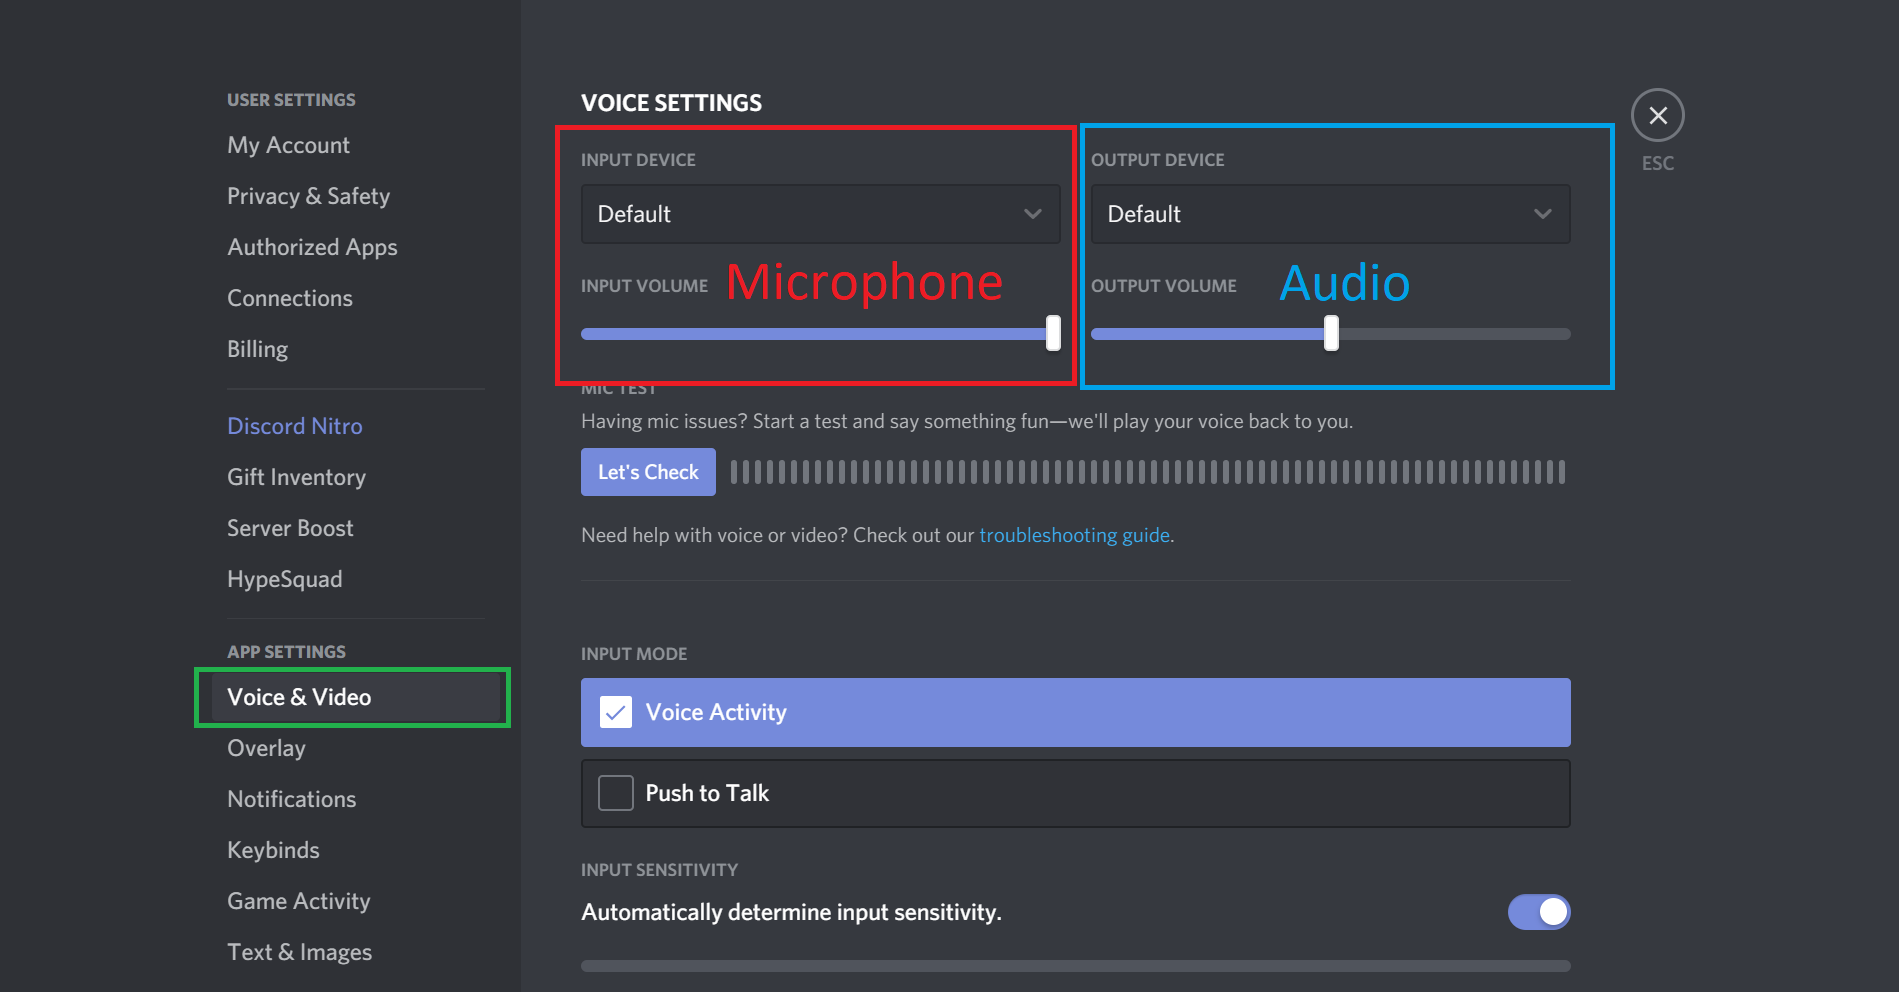
Microphone, audio and camera setup
If you're lucky, your settings are all automatically setup for you. Sometimes however, you'll need to change your input / output / video device. If you go to your settings you'll find a category App settings. In that category you'll find a tab that says "Voice and Video", go ahead and click on it.
Here you'll find everything you need considering your input (microphone), output (audio) and video (camera) settings.
Device configuration
If you click the dropdown on either the input or output device, you'll get to see all the devices available. Sometimes you only have one microphone and one audio device, so then selecting that one or the default works fine.
However, sometimes you have multiple devices connected. In that case you'll have to figure out which one to choose. After you've done that and selected the device you wish to use you can move the slider below to customize how loud you want your microphone / audio device to be. After that have a little Mic check, click the "Let's Check" button.
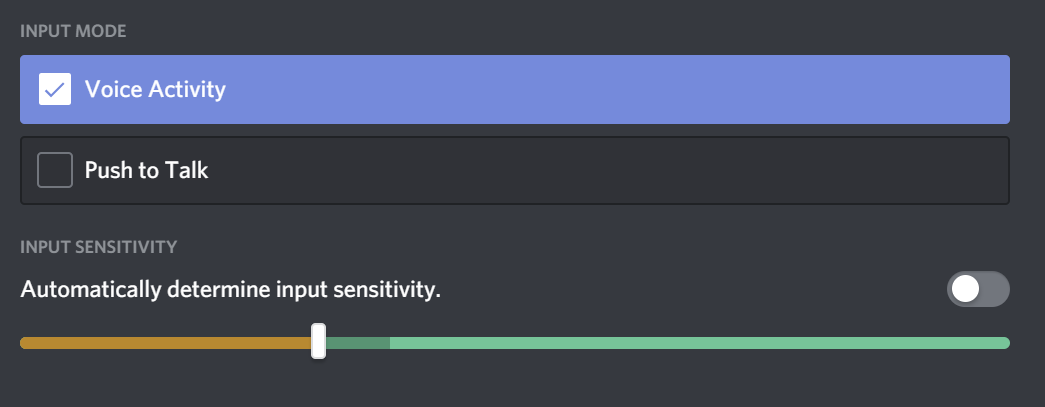
Now that you've set up your microphone we can add some extra settings to it, those are not always necessary but it's good to know of them. There's 2 ways to talk through your microphone.
Voice activity
The first one is the default option, through voice activity. This means that when Discord detects you are saying something it will get put through and people hear you automatically. The sensitivity of Discord detecting you is done automatically by default but you can also determine that yourself by disabling that feature. Next you'll get a green / orange bar with a slider on it. Try talking into your microphone, you'll see how loud you are. To achieve the optimal result you want to place the slider slightly below your average talking loudness. This means that noise in the background won't get through and your voice will.
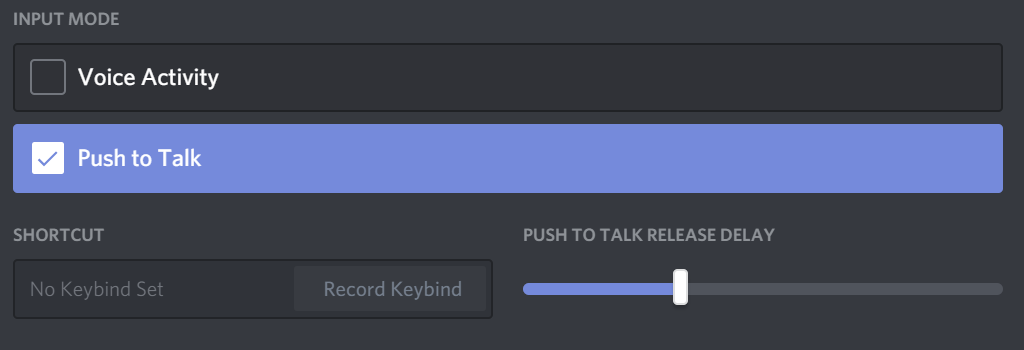
Push to talk
Secondly there's the "Push to talk" option. This means what it says, you'll choose a button and when you press that button people will hear you. To set this up, choose the push to talk option and afterwards record a keybind by pressing that button and when it's recording press the button you want to bind. After that use the slider next to it to determine the release delay. If you want to stop talking immediately after releasing the button you can slide it to 0 ms, if not slide to the amount of ms you want to keep being heard after releasing the button.
Camera settings
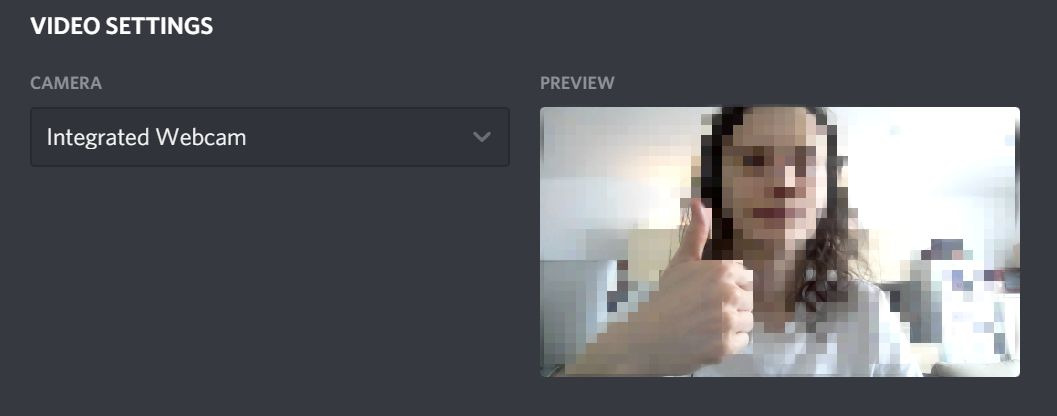
Now that your audio and microphone are set up it's time to take a look at the camera settings. Scroll down a bit and you'll see the Video settings section. Here you can choose which camera Discord has to use and test it by pressing the blue test button. Most of the time you'll only have one camera connected, but in case you have multiple connected you'll need to choose the one you want to use.
Profile Settings
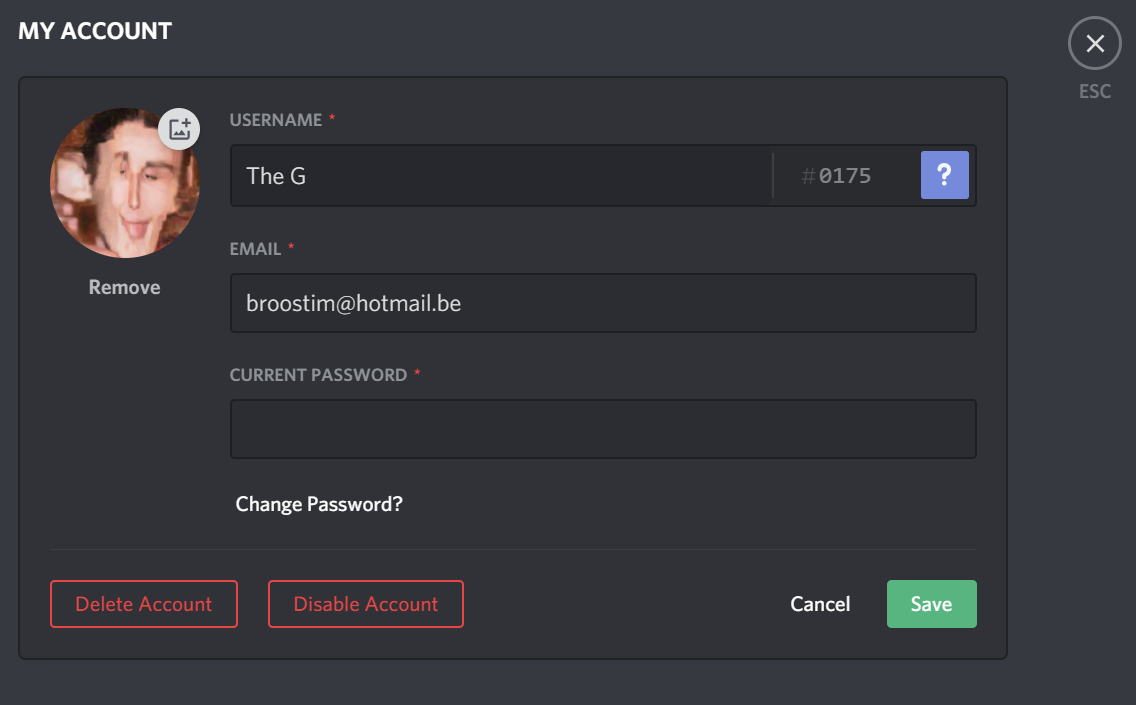
To change your profile picture, email and username go inside the settings by pressing the gear ⚙ icon. Then go inside the tab User settings. Here you can press edit button. Next, you can change your profile picture by clicking on it, then you choose your new picture through your OS interface. You can also change your email and username by changing the input fields. You'll need your password to change them though. If you want to change your password you can also do that by clicking on it in the view. If you're done click save and your changes will update.
Discord appearance
In your settings, under the category App settings, you'll find a tab that says Appearance, click on it.
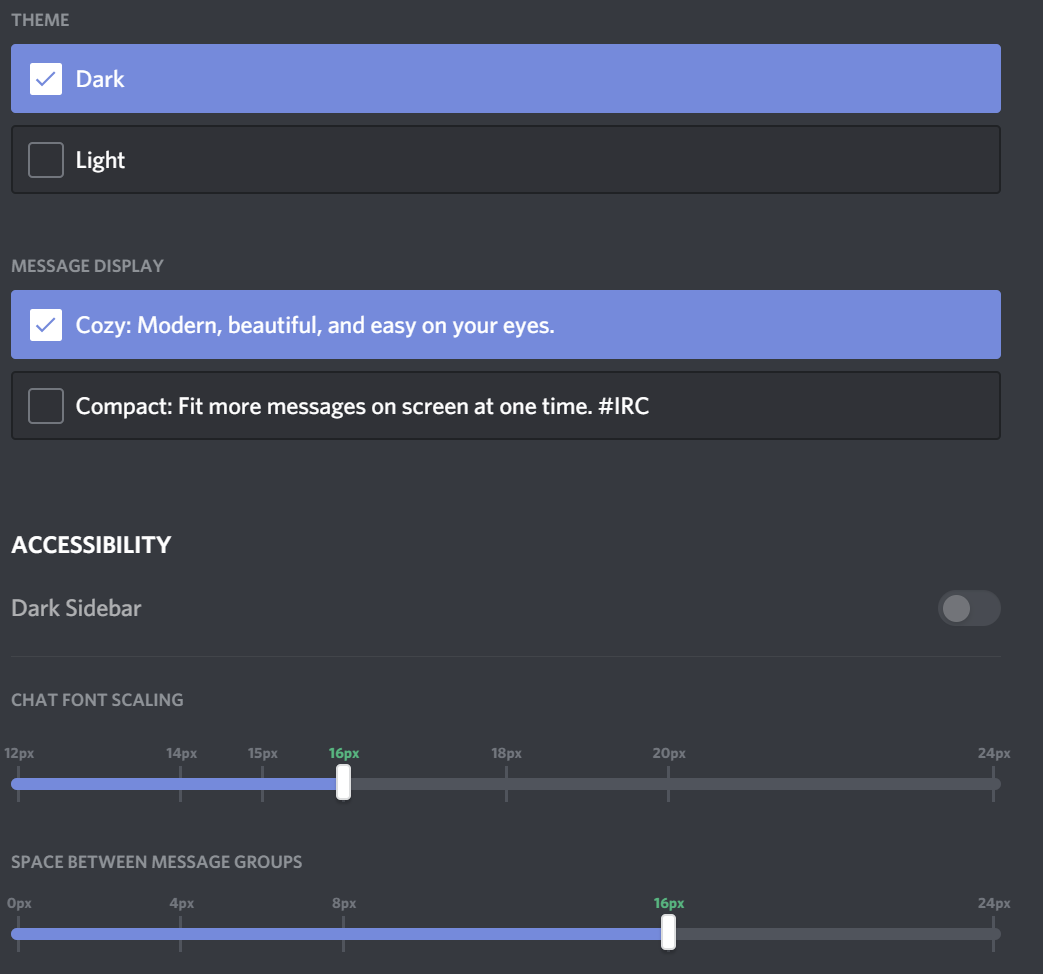
In this view you can choose your theme to be Dark or Light. Under the message display title, you can choose either Cozy or Compact mode. Cozy will display pictures and has more room in between messages. Compact will reduce spacing and remove profile pictures in messages.
Finally, you have the Accessibility section. There you can change the chat font size, space between message groups and zoom level by moving the sliders accordingly. Play around with them and find out what fits best for you!
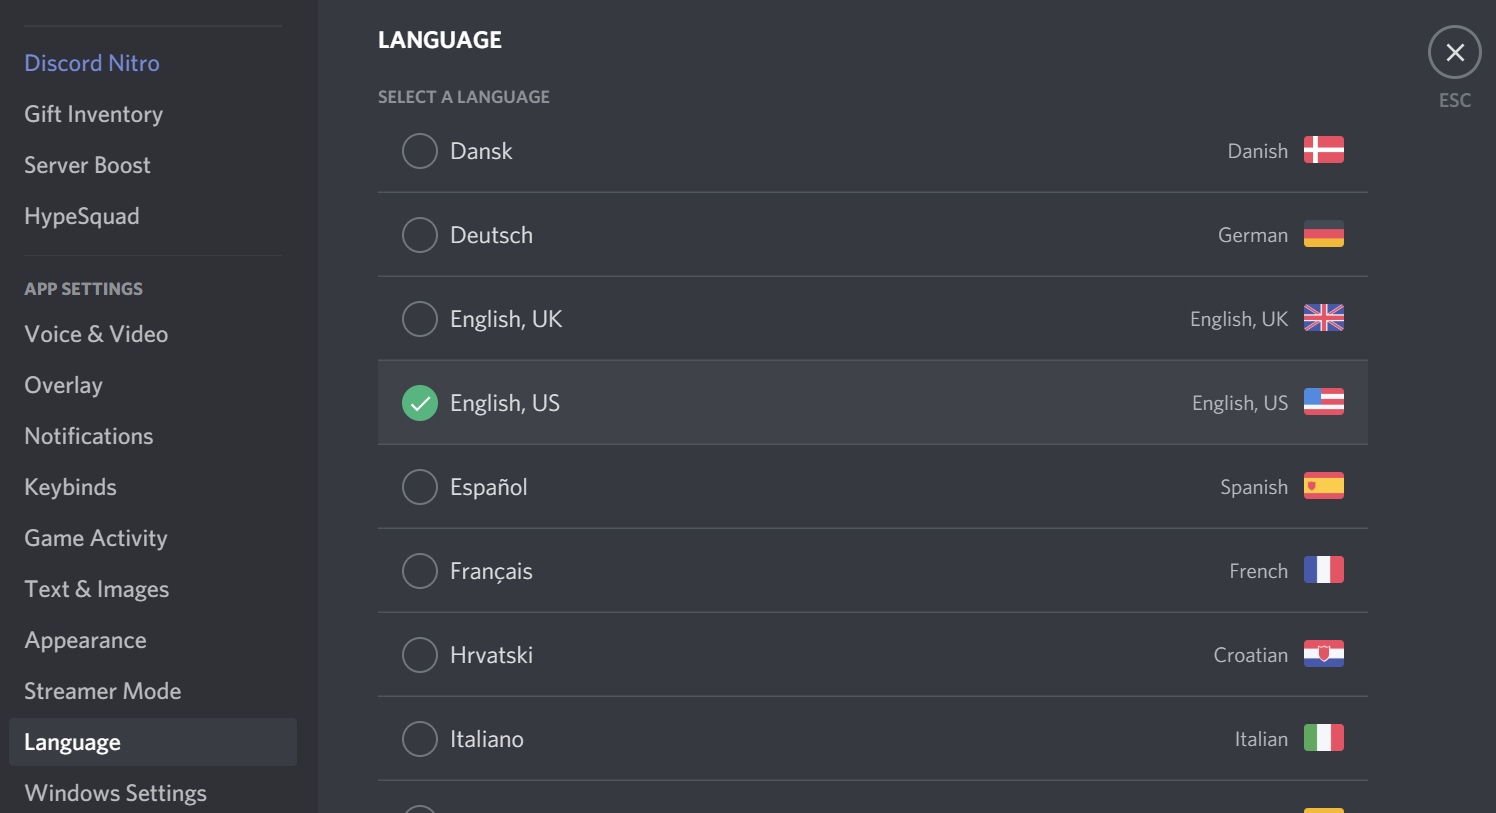
Language
In your settings, under the category App settings, you'll find a tab that says Language, click on it. In this view you can select any language that's inside the list.
Status message
To change your status, click on your profile picture in the bottom left. Then select "custom status". After that, fill in your custom status and press Save. You can optionally choose for how long this status should remain untill it gets cleared in the "clear after" option.
4. Friends
Adding friends
To add friends, click on the home button in the top left and afterwards on the tab friends. To add a friend you'll need their username and tag, you can find your own username and tag in the bottom left, next to your profile picture.
After you've received the username and tag, click on the green Add friend button. Next, fill in the username and tag in the input field and send your request by clicking the button.
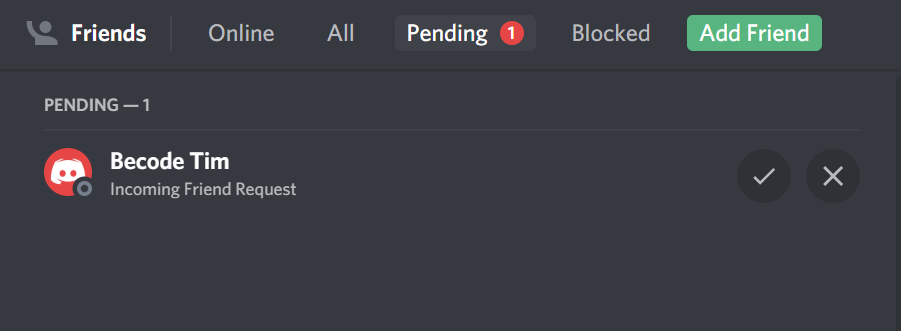
The person you've sent your request to now has a notification and a pending friend request in his pending tab. If they accept your request they'll be displayed in your friend list.
Another way to add friends is to right click on them and then press "add friend".
Removing friends
To remove a friend, right click them anywhere you can find them or go to your friends and click the triple dot icon. From there you can click on the remove friend button. Finally you need to confirm you want to remove you friend.
Blocking
To block someone, right click them and click on the tab "block". They'll be blocked as of now and you can confirm that if you navigate to friends → blocked. To unblock them, press the unblock button.
5. Servers
Joining a server
To join a server the first thing you'll need is an invite from someone. After someone has sent you an invite link to join a server, click the + plus icon in the server list. Next, choose "join a server" and enter the received link in the input field. After clicking join you'll see that you've joined the server.
Inviting to a server
There are two ways to access an invite link to invite people to your server. The first one is right clicking the server icon you want to invite people to and then clicking "invite people". The second one is clicking the  invite icon to the right of any voice or text channel in that server. Next, you can either Customise your invite link or just send it as it is.
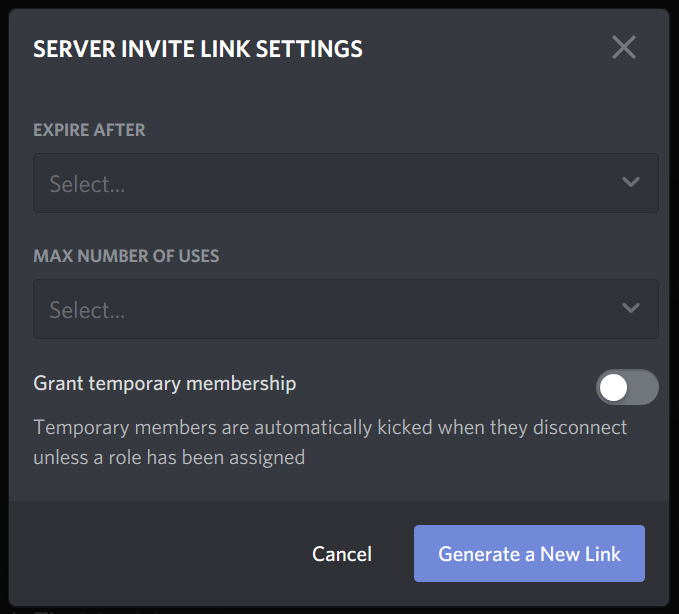
Customising your invitation
Click the ⚙ gear icon in the bottom right of the invite view to start customising your invite link. It has 3 purposes, the first one is to set an expiry date. People who get access to your invitation link after the expiry date will not be able to get into the server.
The second purpose is to set a maximum amount of uses, this means that if you set it to 5 that the link will stop letting people in after 5 people have joined the server.
The third use is granting temporary membership, this is meant to let guests inside your server without having to worry to remove them afterwards. However if you grant them a role in your server they will not be removed.
Navigating servers
By clicking the server icons in the server list to the left, you can navigate different servers. While inside one, you can navigate the different voice channels and text channels by clicking those as well.
Changing your nickname on a server
There's 2 ways to change your nickname on a specific server. The first one is to right click a server and then go to "change nickname". The second one is right clicking your profile in the members list of the server. Your new nickname will be displayed immediately and only for that specific server.
Grouping servers
You might at some point have too many servers to handle, in that case you can group them to get a better grip at managing them. To do this, drag a server you want to group to another server you want to group it with and drop it to make a folder. Once this folder has been created you can add as many as you want by dragging another server into it. You can also drag servers out of a group.
Finally you can right click the folder to mark it as read or customise it. In the customisation of the folder you can change the folder name and give it a nice color.
6. Communication
Private Communication
Before you can start a private conversation with someone you'll need to either be friends or share a mutual server. If you want to chat with someone that you don't share a server with, add that person to your friend list.
Before you can start a private conversation with someone you'll have to open one. You can do this by either messaging or calling that person. After that's done you can always find that conversation back in your message list. To find your message list, click the home buttton. Your messages will be displayed in the "direct messages" tab.
Messaging
To send a message to someone you share a server with, go find that person in the members list of that server. Right click their icon and click message. To send a message to a friend, go to your friend list and find that user. Next you can just click the message icon to the right of their profile. Both ways will open a private message in your message list.
If you can't find the user you're looking for, try entering their username in the search bar above your friends when you click the home button.
Calling
You can also call people by right clicking their profile picture and then selecting "call". However if you've already opened a direct message with that person, you can open that conversation and click on the telephone icon at the top right. This will start a voice call with that person.
Streaming your screen / camera
To stream your screen or camera privately, you first need to be inside a voice call with someone. After that's done, you can click on the camera or screenshare icons in your call. Sharing your camera is easy, just click on the "turn on camera" button and it's done. Sharing your screen however, can get a little tricky.
You get the choice what part of your screen you want to stream. When you click the "share your screen" button you'll see a list of applications to choose from. If you want to just show one particular view on something, this option is perfect and you can just select the window you wish to show. If however you want to stream multiple different windows, you want to go over to the tab "screen" and select one of your screens to stream. This will show that entire screen to your audience.
Once you've selected a screen or application you can choose which resolution your stream has to be and which framerate it has to have. When you're done click "go live" and your stream will start.
Server communication
If you want to communicate through a server, you'll first have to join one. After that, you'll be able to communicate through different text channels and voice channels. If you have trouble figuring out what's where check out the what's where section.
Text channels
To the left you'll see all text and voice channels when you're inside a server. Text channels always have a leading hashtag #. By clicking on the text channels you can hop from channel to channel and view the content of it if your role has the permission to do so. To the right in the members list you'll see all the people who can read the messages in that channel.
Voice channels
Below the text channels you'll find the voice channels, they always have a leading speaker 🔊 icon. There can already be people inside of that channel, in that case you might want to watch out that you don't join a filled channel with your microphone blasting loud sounds. A good practice is to enter a channel muted and unmute yourself when needed.
To join a channel, click on it. You'll see your profile picture in the voice channel. To leave, press the disconnect icon or switch to a different voice channel. You don't have to leave a channel to switch to another channel, just join the one you want to be in.
Mentioning
Sometimes you want to target messages to a person or specific people. This will only work when the people you are targeting have access to the text channel you enter your mention in. When you mention someone or a group of people they will receive a notification of your message and the message gets highlighted in their message history. There are 2 types of mentioning.
The first type are the mentions with a leading "@". Those can be used to target one person, everyone in the server or everyone in the server that is online. To target one person just enter "@username" and replace username with the desired user's username. To target everyone in the server enter "@everyone". To target everyone in the server that is online enter "@here".
The second type are the mentions with a leading "#". Those are used to target everyone that has access to a specific text channel. For example you could enter "#general" to target all people that have access to the "general" channel.
Streaming your screen / camera
Sharing your screen or camera in a server is very similar to doing that privately, but the buttons are in a different place. To start, you'll have to be inside a voice channel. After that's done, you can click on the camera or screenshare icons above your profile in the bottom left. Those buttons work the same way as in a private call. When you share your screen you'll see live next to your profile name. Click here if you want to take a look at how those buttons work!
Joining a livestream
Joining a livestream is very simple, hover over a person that is streaming, you can see that they're streaming when they have the live indicator next to their profile name. Next just click "Watch Stream". You should be able to see their screen now.
Muting / deafening
To mute yourself, press the microphone 🎙 icon. To deafen yourself, press the headset 🎧 icon. Both are located at the bottom left above your profile. When you click them you'll see a red stripe across the icons. This means you are now deafened or muted, or both. To unmute or undeafen yourself, click it again.
Muting or deafening other people can be done in 2 ways. The first is to only do that for yourself, that means that other people can still hear them but you won't. When you right click that person and press mute, you won't hear that person anymore. Until you click that box again, that person will remain muted for you, even the next day.
The second way is to server mute or deafen a person. This means this will work across the whole server, nobody in the server will hear them and you can also server deafen them so they will hear nobody in the server as well. To do this you'll also have to right click that person. If you have the rights to do so, you'll have a few red lines of commands. To server mute them, check the red server mute box. To server deafen them, check the red server deafen box.
Messaging tricks
Did you know you can use 4 different text styles? These are Bold, Bold Italics, Italics, Strikethrough text, and Underline.
For bold Discord text, you just need to add two asterisks(**) to either side of the text.
Enter: **Your chosen text**
For italic Discord text, you just need to add a single asterisk(*) or underscore(_) to either side of the text.
Enter: *Your chosen text* or _Your chosen text_
For bold italic Discord text, you just need to add three asterisks(***) to either side of the text.
Enter: ***Your chosen text***
To underline your Discord text, you just need to add two underscores(__) to either side of the text.
Enter: __Your chosen text__
To strikethrough your Discord text, you just need to add two tildes(~~) to either side of the text.
Enter: ~~Your chosen text~~
Combine these in any way you like to spice up your discord text game!
Next, there's also some fun commands you can make use of! In the message input, type slash "/" to see a list of commands. They're pretty self explanatory, try some of them out. I'm sure you'll quickly find out what each of them does! Be careful with the "/tts" command though, this command stands for "text to speech". What this does is it will read your next message out loud to everyone in the server. Always be careful with stuff that reaches out to everybody!
Emojis
There's multiple ways to add emojis to your message. First of all you can add emojis in the same way we've been familiar with for a long time. If you want a smile, you can type ":-)", if you want a heart you can type "<3", and so on. However there's a ton of emojis that you can't make this way. To add those there's two other ways to add them.
The first one is to click on the emoji to the right of your message input. To the right of the screen that opens you'll find the different categories of emojis you can find. If you click any of them they'll be added to your message.
The second way is to input the emoji code, but you'll have to know what it is for each emoji. However, those are pretty self explanatory. For example, if you want the "tired face" emoji, input ":tired_face:" in your message.
Code in a message
To add code to your message, add 3 opening and closing backticks. Next to the opening backticks you can define which code language you're using. This is an example:
```javascript
window.alert("skeet");
window.alert("yeet");
```
Attachments
Press the plus "+" icon to the left of your message input to add an attachment. Next, navigate to the file you want to upload and select it. After that, you can choose to add a comment or not. If you're ready, press "upload" and you'll have sent your attachment. The maximum file size you can upload is limited though, so it's mainly used to share images or small files. You can also drag and drop any file or image that you want to add as an attachment into your message.
Pinning
If you ever want to remember certain messages or make sure other people can find your message back, pinning is the right tool for you! To pin a message you can click on the three dots to the right of the message or right click the message, next click on "Pin Message". You can now find all pinned messages back in the top bar. In this list you can also unpin your messages by clicking on the x and confirming your deletion.
Searching
In the top right you can find the searchbar. You can also press ctrl+f to start searching. If you're looking for a specific message this is the place to be. Just looking up based on text is the easiest way but you can also use a lot of filters to efficiently find a message back. Discord has a good page explaining all their search filters, which you can find here.
Inbox
You can find your inbox in the top right corner. In there, you can see all your mentions and filter them. On top of that you can also find all the unread messages and mark them as read if you want to.
7. Notifications
There's 2 kinds of notifications that you can manage. The first one are general notifications. The settings of these notifications apply to everything, everywhere. The second one are server notifications. The settings of these only apply to the specific server / channel of which you configured them.
General notifications
You can find these in your settings under the tab "app settings". In here you can configure desktop notifications when you get an unread message. If you're using Discord on mobile as well you can also configure when the notifications also have to appear on your phone. If you're using Discord on your computer those will not go through unless if you're inactive for a period of time that you can configure yourself. This means if you're not at your computer for a while, the Discord notifications will get pushed to your mobile device.
Apart from visual notifications we also have audio notifications. By default the audio notifications are enabled on all actions such as a message, muting, deafening, and so on. If you wish to only have sound notifications on some of those actions go ahead and disable them.
Server notifications
To configure the server notifications you can right click the server and then click "Notification Settings". In here you can do some customization of your notifications. If you don't want any notifications coming from this server you can mute them. Next you can choose if you want to have notifications to enable them on either all messages or only when people mention you. On top of that you can mute the annoying "@everyone" and "@here" mentions if you wish to do so.
The server notifications apply to all the channels in the server, but if you wish to customise specific channels to have a different way of handling notifications, you can also configure that. To do this, right click a channel and then hover over "Notification Settings". In here you can choose to use the server default or not.
8. Privacy settings
You can find the privacy settings in your settings under the tab "User Settings".
Messaging
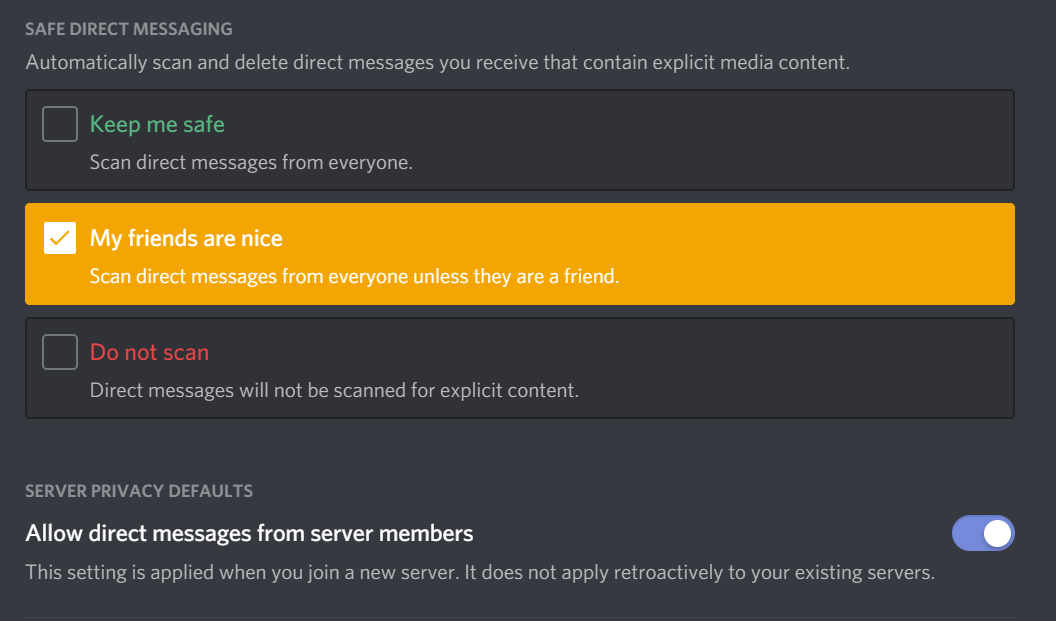
Under the tab "Safe Direct Messaging" you can make Discord scan messages from certain people to make sure you don't get any explicit media content. You can choose to either scan all messages, only messages from non friends or never scan any messages. Furthermore you can also choose if people that share a server with you are allowed to send you messages.
Friends
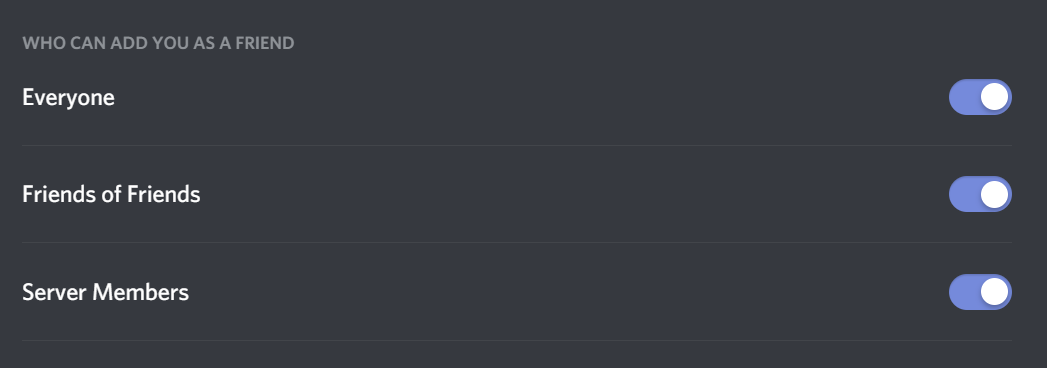
If you scroll down you'll find a section called "Who can add you as a friend". In this tab you can choose which people are allowed to send you a friend request. This could be either everyone, friends of friends or server members, aka people you share a server with.
Data
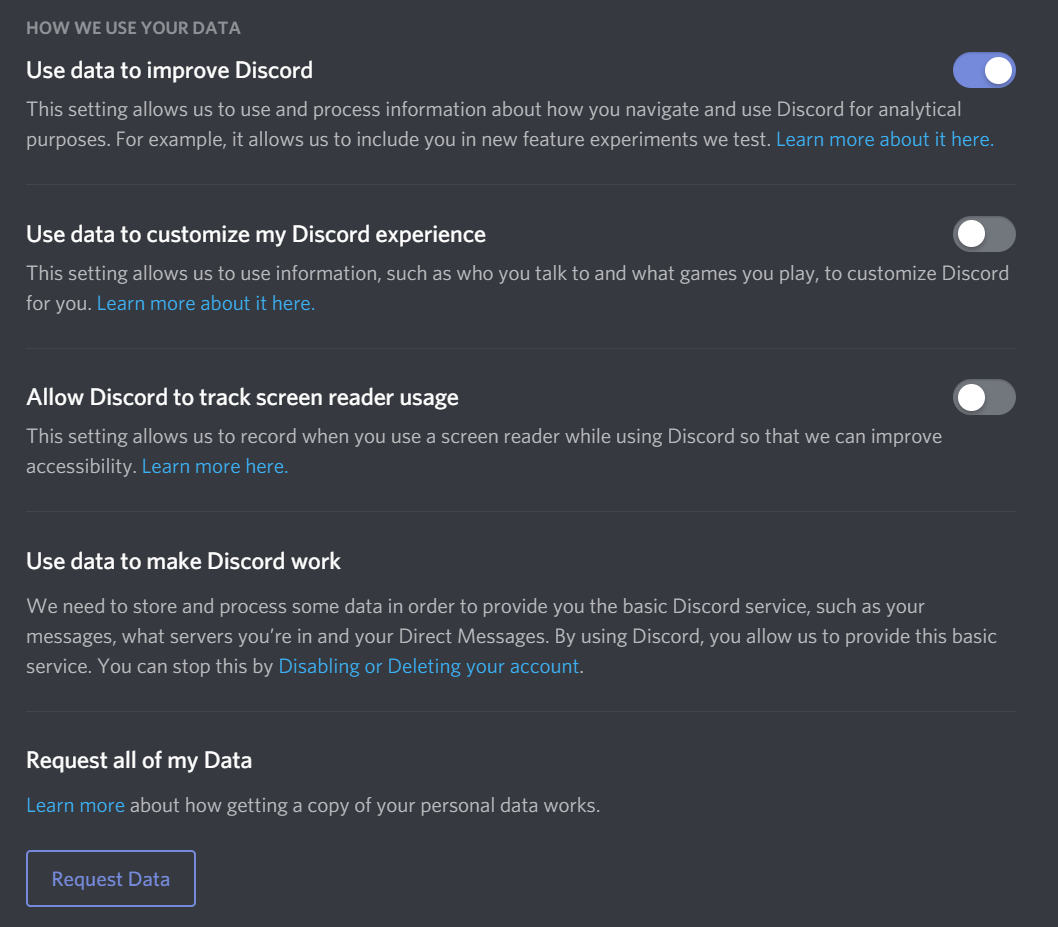
Under the tab "How we use your data" you can customise some stuff concerning the data you share with Discord. They are described pretty clearly but if you want to learn more about it you can click the "learn more about it here" link.
You can limit the data shared by disabling each option but you can't share none of your data. Discord needs some of your data to provide their services and if you don't want this the only way to stop it is to disable or delete your account. If you would like to take a look at the data they have from you, you can request your data. This will take about a month max and your data will be sent through email.
9. Server administration
Making a server
In the server list at the bottom you'll find a plus (+) icon, click on it. From here you can choose to join a server but also make one! Once you click on "create a server" you'll get a few options. You can either choose to make a blank template server or use one of the pre designed templates Discord made to make your life easier. Once you pick any of the options you'll get to name your server and optionally give it a picture to remember it by. When finished, you'll have created your own server!
General configuration
At the top left, next to your server name you can click on the arrow to get a dropdown with some server configuration options. Let's head into the server settings. In here you have a few tabs, the first one is the overview. In here you'll find the general configuration of your server.
At the top you'll have the options to change the server name, server image and server region. The first two are just for visual purposes but the server region is quite important. Generally you want to choose a region that is close by so that your server isn't slow. Sometimes however, the specific region that you're using might be overloaded and your server will experience some inconveniences. To solve this, you can change your region to some other region that is still pretty close. For Belgium, I've noticed switching between Europe and Russia works best.
Inviting to a server
If you hover over a voice or text channel, the invite icon will pop up. When you click it a popup window will appear. You can straight up invite friends from there or copy the link at the bottom and pass it to anyone you'd like to invite to the server.
By default, this invite link will work for one hour after it has been generated but you can customise the invite as well. After clicking "edit this link" you can change the expiration date of your link and the maximum number of uses. Another thing that you can do is grant users temporary membership with the invite. This means that they can join your server but when they leave the channel they will be removed from the server.
Creating channels
To the right of each category, for example "text channels" there's a plus icon (+). If you click it you get to add a new channel, however first you have to select if it has to be a voice or text channel. After that, give it a name and confirm to add your new channel.
Roles and permissions
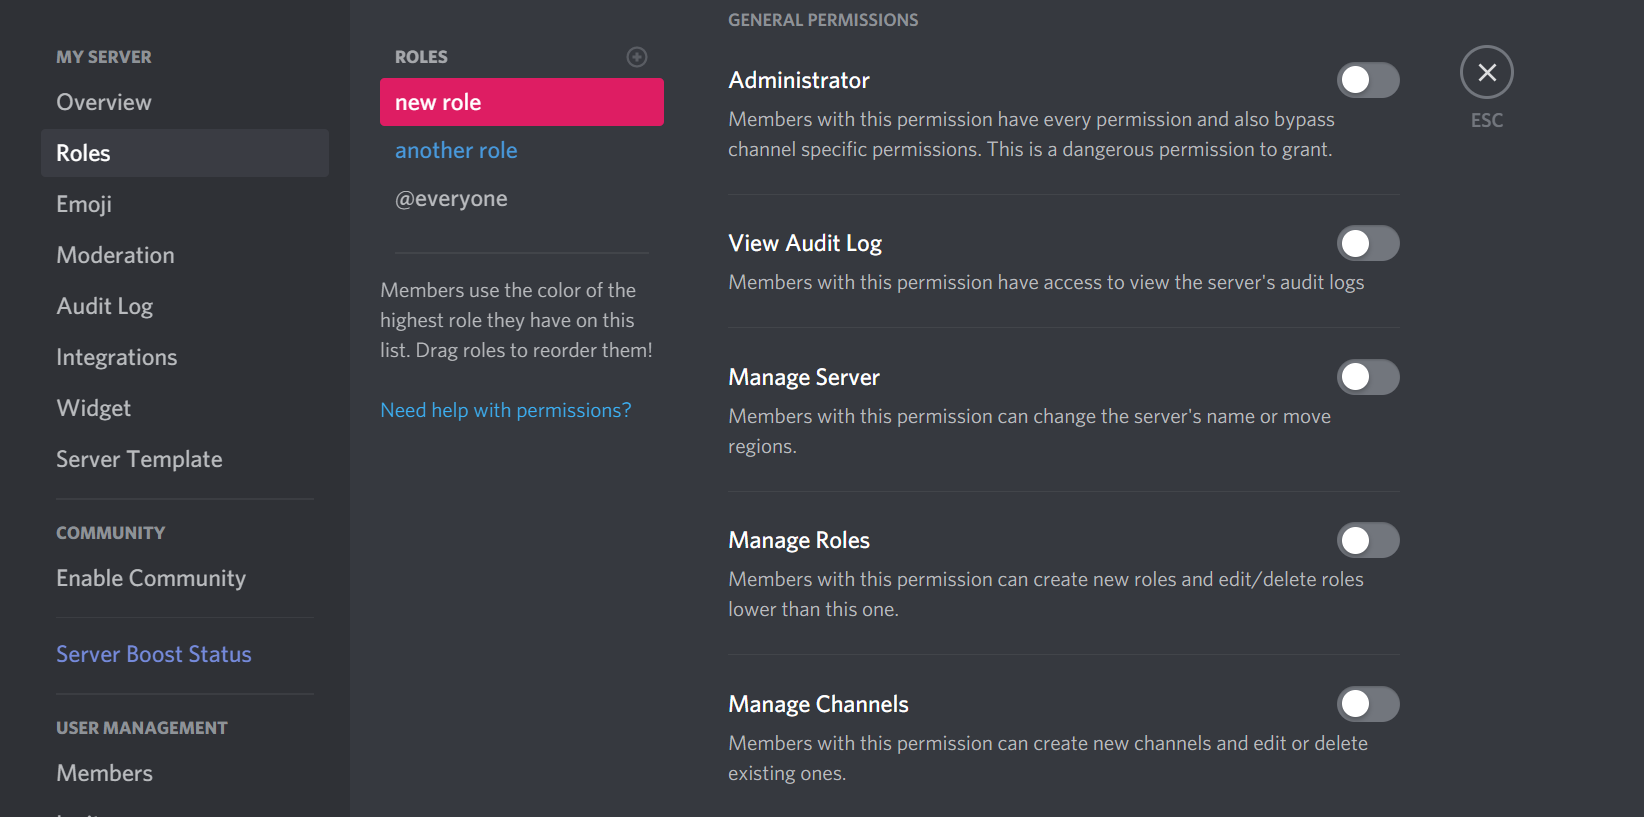
Under the tab "Roles" in the server settings you'll find the roles and their permissions. In here you can add new roles by clicking the plus (+) icon. You can give them a colour and set their permissions accordingly. For example, you could have a role "user" and a role "admin". The user role would only have access to sending messages and joining calls, whereas the admin role would also be able to delete messages, kick members and so on. For a more detailed view on roles and permissions check out this website.
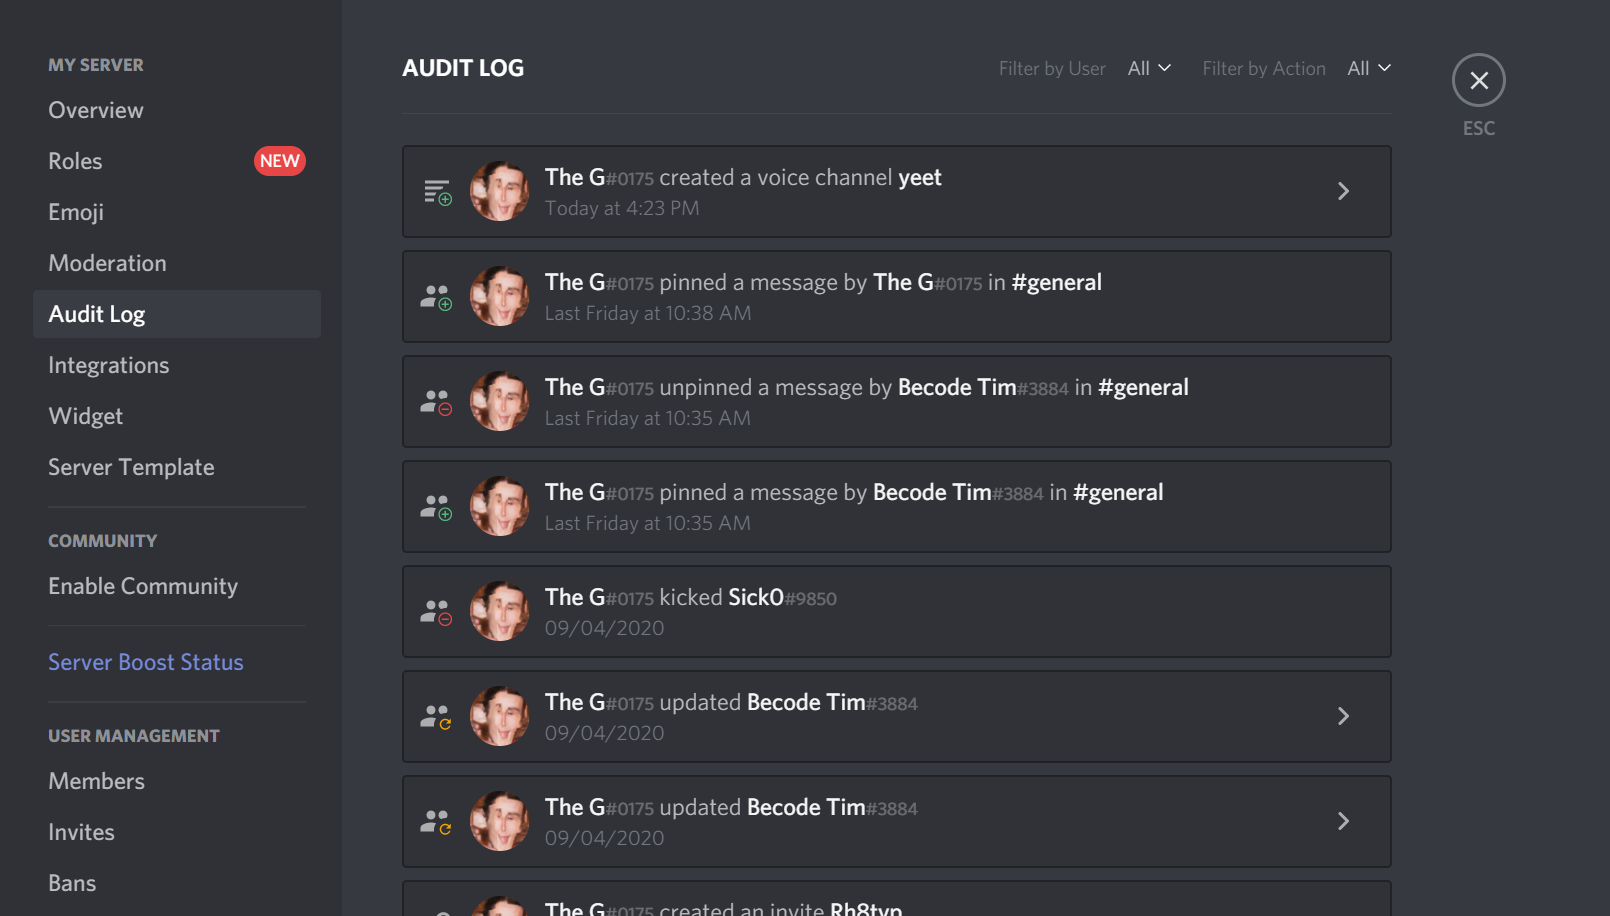
Audit log
The audit log is the collection of everything that anyone did on the server. To check it out head over to the server settings under the tab "Audit log". From here you'll see a view like the following image. It displays a user that did an action and what that action was and when they did it.
Custom emojis
To add custom emojis, head over to your server settings. Under the tab "Emoji" you can upload new emojis and use them in that server. You still have to name them with at least 2 characters and the image you use can't exceed 256kb in size. If you've added the emoji you can use it in a chat by typing ":yourEmojiName:".
Adding bots
Bots can be good fun, for example, you could add a bot to play music in a channel so your friends can listen together. There are a lot of bots with different purposes but let's take the example of Rythm bot. It's a bot that can play music. To add it, head over to their website and click "Add to Discord". Next you'll need to log in to your Discord account. After that you can choose to add it to any server you have admin rights on. You can't add bots to servers that don't give you the permission to add a bot. That's all there is to it! But how to use it now? Just command it!
Warning
Do not carelessly add bots! Make sure you get your bots from a trusted source or bots you made yourself, as there are some malicious bots that could jeopardise your server. Generally, if enough users have already used the bot it should be safe. If you want to add a specific bot, research it a bit and take a look if a lot of people already used it.
Permissions / Security
A bot will also need some permissions to be able to do certain things, however you don't want to give it too many permissions. To do this you can make a new role specifically designed for the bot you wish to add. For example, a bot doesn't need the permission to kick people out of your server, but if it has to play music, it is required for it to be able to join a voice channel.
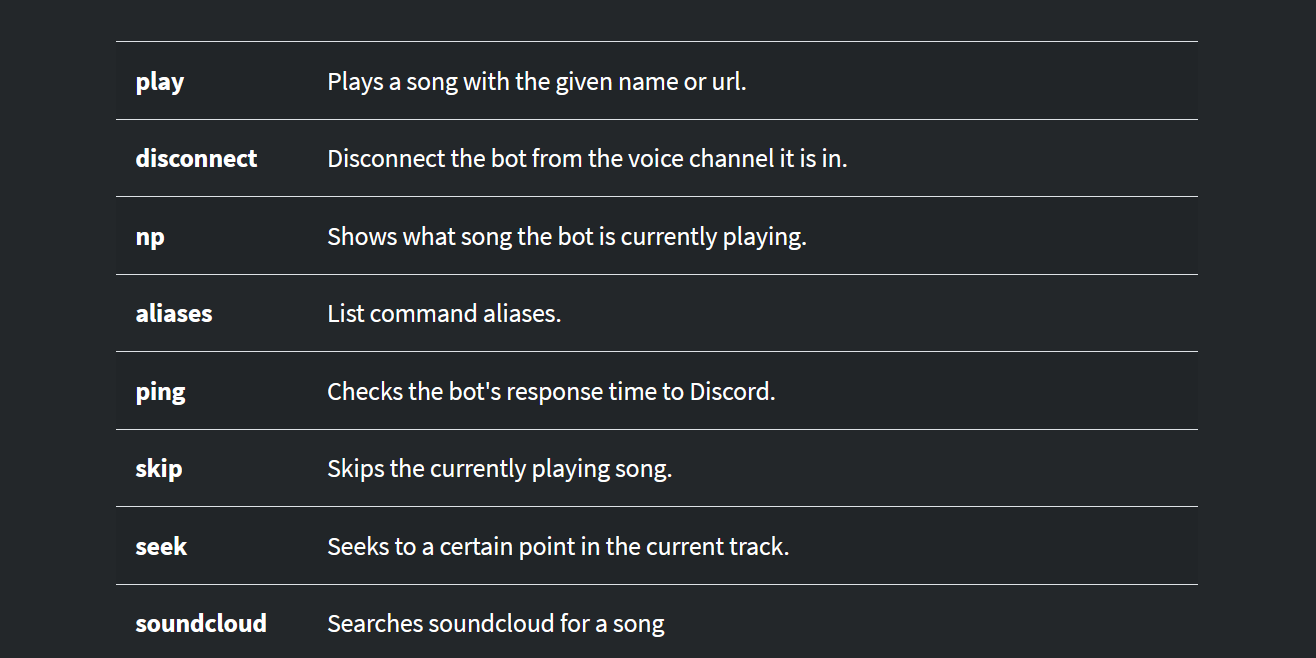
Commands
To make a bot complete certain actions, you'll need some commands to tell it which action it has to perform. Every bot has their specific list of commands, as you can see from the example of Rythm bot to the right. On top of that you also have to add the prefix in front of the command to let the bot know you're trying to command it. By default the Rythm prefix is an exclamation mark (!). So, if I would want to play a song for example, the command would look like the following:
!play Limp Bizkit Break stuff
This will make Rythm bot search the song "Break stuff" by "Limp Bizkit" on youtube and play it in the voice channel you're connected to.
Making bots
Now that you understand the usability of bots, you might want to make your own. There are tons of guides on how to make a basic Discord bot, in my personal opinion I like this guide.
10. FAQ
- There's some loud music / noise when I join a call, how do I turn it off?
- In the voice channel there might be a bot playing music or someone making loud noises, you can mute it by right clicking the mute target.
- How do I selectively mute notifications?
- There's 2 types of notifications, general and server notifications. Check this out if you want to know more about managing them.
- I can't hear anybody, how come?
- There's multiple possibilities. First check if you are deafened. If it's the case, un-deafen yourself. If that's not the case take a look if the person you're talking to is muted.
Finally, if you still don't hear anybody there's something wrong with either your audio levels or your settings. Try first turning your volume all the way up. If you still don't hear anything there's something wrong with your settings. - Nobody hears me, how come?
- There's multiple possibilities. First check if you are muted. If that's not the case take a look if the person you're talking to is deafened.
Finally, if people still don't hear you there's something wrong with either your microphone or your settings. You can check if your mic works by visiting this website and following their instructions. If your microphone works there's something wrong with your settings - How do I organise a presentation in Discord?
- First of all you'll need to let your audience know where to find you. You can privately contact each one or you can mention a group of specific people. After that you'll join a voice channel together with your audience. You'll probably want them to mute themselves so you can present without noise in the background (unless they have a question of course).
Next, the choice is up to you as to how you wish to present. You're ready to give a presentation with your voice only if you prefer but you can also stream your camera. What I prefer most is sharing my screen and presenting something on my screen to the audience. - Someone called me privately but I didn't notice, can I turn on the calling sound for it?
- Yes you can, but only if you are friends with this person. If you're not you'll get a notification that's the same as a text message. If you are friends though you'll get a popup window when that person calls you.
- My microphone is making a lot of noise, can I filter it?
- Yes you can! It's in your microphone settings. Change your input sensitivity.
- There's so many servers in my list, how do I manage them?
- You can make folders and put your favourite servers together, your gaming servers, your work-related servers, etc. Just drag the server over another server / folder you want to group it with.
- When I livestream, my audience doesn't see my entire screen, just one window.
- This is because you're streaming an application, not your screen. Right before you click on "go live" you should go over to the tab "screens" and select the screen you want to stream instead of a window. To find out more, click here.